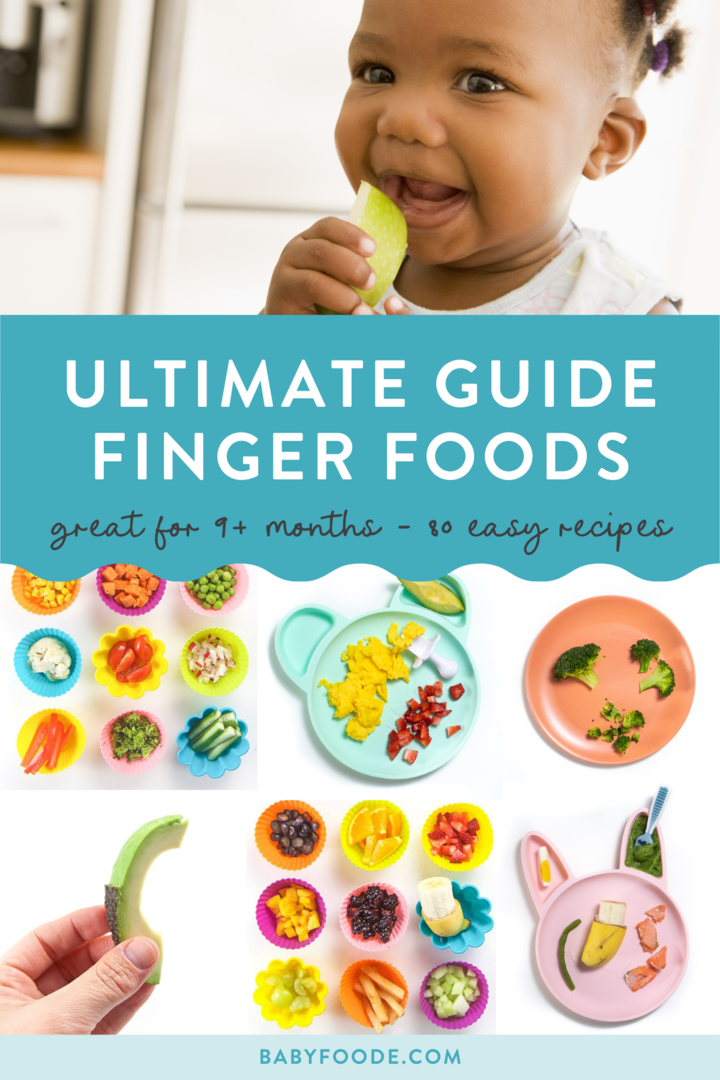
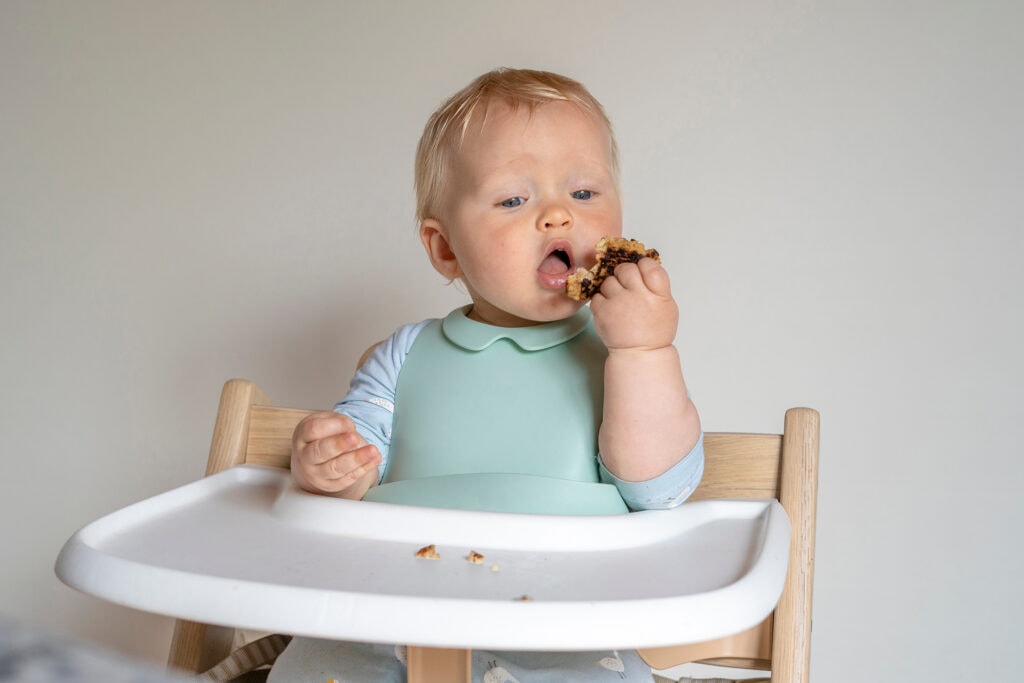
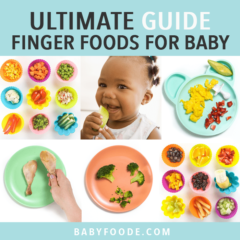
Ultimate Guide to Finger Foods for Baby
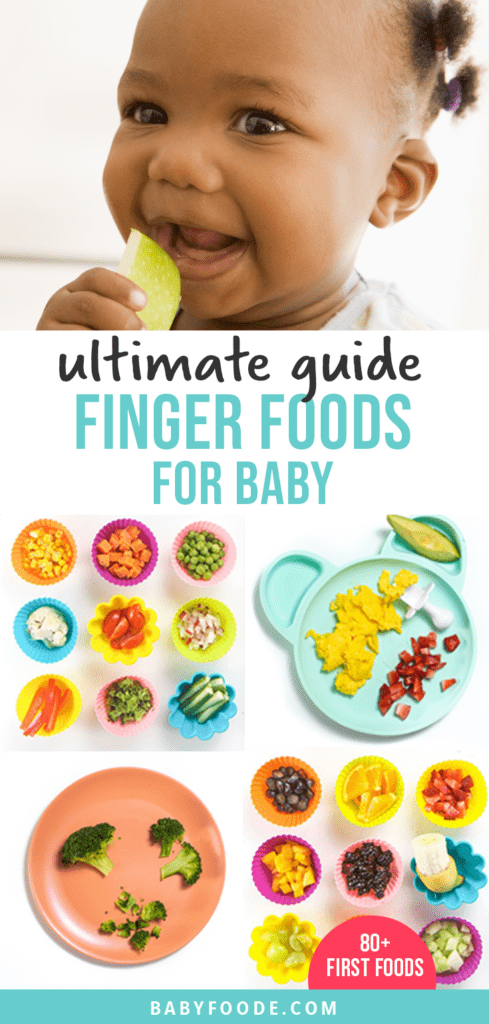
This Ultimate Guide of Finger Foods for Baby has everything you need to know to start serving finger foods to your baby! Over 80 tasty finger food ideas, choking vs. gagging, sample feeding schedule, helpful tools, how to teach baby to chew, and much much more! This in-depth guide is perfect for babies ages 9+ months!
Medically reviewed and cowritten by Jamie Johnson, Registered Dietitian Nutritionist (RDN), and Lauren Braaten, Pediatric Occupational Therapist (OT).
Finger Foods for Baby
Has your baby been eating purees and is now ready for the next stage in their culinary adventure? Does your baby keep trying to take pieces of food out of your hands? Do you know that your baby is ready for solid foods but not sure how or what to feed them?
Then you’ve come to the right spot!
I’ve spent over 9 years making, talking about, researching, thinking about, and talking with experts about foods for your baby, I now have the answers to all of those questions and more! Below you will get all the information you are looking for.
In this ultimate guide, I’ll share everything you need to know to get started serving finger foods to your baby! Starting from what exactly are finger foods to every parent’s concern of choking vs. gagging, this guide covers it all. I will also share how to know when your baby is ready for finger foods, over 80 easy foods to offer, a helpful sample finger food feeding schedule, helpful tools to have on hand, and more! This guide is great for babies 9 months and up! You can also check out my best-selling cookbook for even more information and recipes!
Tip: not sure which stage your baby is in, don’t worry, you can read my Guide to Baby Food Stages that will break it all down for you.
Finger Food Video
Is your baby ready to start finger foods but you aren’t sure where to start? Then watch this video to learn more!
When to Start Finger Foods
You can intorduce finger foods to your baby once they have mastered purees (if you are doing the traditional weaning approach). This will be different for all babies, but it’s usually between 7-9 months of age. This is about when the palmar grasp is getting mastered, the pincer grasp is developing, and your baby has learned to bring her hands to her mouth.
The World Health Organization (WHO) recommends “the introduction of nutritionally-adequate and safe complementary (solid) foods at 6 months” (1). Those following a more traditional baby-led weaning approach will typically introduce finger foods around 6 months. Those following a traditional weaning approach (starting with spoon-feeding purees first) will typically introduce finger foods around 8-9 months after a period of feeding purees.
Therefore, the exact age of when to introduce finger foods will vary depending on your baby and the approach you use, but 6-8 months is an average range. Just don’t wait too long to introduce finger foods – one study found that babies introduced to lumpy solids after 9 months ate less of many of the food groups at 7 years of age, compared to those introduced to lumpy foods between 6-9 months (2).
Remember though, your baby may need to start later than this range, depending on factors such as premature birth or any developmental concerns. Discussing your plan to start solids, including finger foods, with your pediatrician is always recommended.
Before starting finger foods, make sure your baby is showing readiness signs of:
- Sitting with minimal assistance
- Good control of their head and trunk
- Bringing hands and toys to their mouth
- Appears interested in food, possibly by reaching for or leaning forward towards food
3 Ways to Introduce Solids to Baby
There are several different ways you can introduce finger foods, or solid foods, to your baby. Here are some of the most common methods.
Baby-Led Weaning
Baby-Led Weaning is the method of feeding baby finger foods from the very start, roughly 6 months of age. In this weaning approach, you skip the puree phase altogether.
- Keep it simple and start with 1-3 foods at a time. Avoid putting too large of quantities on the tray or plate. We eat with our mouths as well as our eyes, meaning that sometimes too much food can be visually overwhelming for a beginning eater.
- Start with stick-shaped, soft finger foods. Think soft and ripe fruits like avocado or soft-cooked veggies like sweet potato. Foods should be cut into pieces roughly the size and width of an adult pinky finger to make grasping easier. Cutting foods smaller than this can be frustrating for a 6-month-old since they lack a pincer grasp at this age.
- Consider texture. Cook foods so they are soft and squish gently between your thumb and index finger, but not so soft that the food turns into mush quickly when held. On the other hand, make sure food isn’t too hard so that it is a choking hazard.
- Support baby’s grip. You can help your baby grasp foods easier by giving it a light coating, such as rolling a banana in finely crushed cheerios or crackers. Cutting foods with a crinkle cutter, a simple kitchen tool, can also add texture that improves grip.
In Stages
If you’ve introduced solids by progressing through the different stages of baby food purees (stage 1, stage 2, and stage 3) and are ready to introduce finger foods, many of the tips listed under combination feeding are also applicable here.
The different stages of baby food purees vary, but typically stage 1 includes single-ingredient foods that are blended into a thin consistency, with no chunks or pieces. Examples include single fruits, vegetables, or rice cereal. Stage 2 typically includes purees of a slightly thicker texture with more than one ingredient and a greater variety in flavors. An example of a stage 2 baby food puree might include blueberry chickpea puree.
Stage 3 typically includes purees of a thicker texture puree, and often have pieces or chunks mixed in that baby has to chew. Some babies do well with stage 3 baby foods and are basically ready to tackle finger foods shortly after this. Other babies may struggle with this mixed texture combination of puree and chunks together. The chunks of food in commercially made stage 3 baby food can be challenging because up to this point, your baby learned to eat by propelling the purees back with a sucking motion (and has likely gotten pretty good at swallowing these stage 1 and stage 2 purees with ease). With stage 3 purees, your baby is trying this same strategy, only now they are trying to suck the puree with the chunks of food also. This can often cause gagging and sometimes choking as your baby adjusts to this mixed texture.
- It’s okay to skip stage 3 baby foods completely. If your baby has been progressing through stage 1 and 2 foods but does not seem to be handling stage 3 foods well, it’s okay to start moving towards finger foods. You can go straight to offering soft-cooked finger foods via the baby-led weaning approach above.
- It can be helpful to offer some foods that are meltable or dissolvable in texture, especially if you’ve been using stage 1 and stage 2 baby food purees for longer than you anticipated. Think foods that break down easily in the mouth with saliva and little to no mouth movements. Examples include puffs, yogurt melts, and thin, wafer-style teething biscuits. These foods are like a tool to help your baby feel more comfortable with a food in their mouth that isn’t a puree, but still breaks down easily.
- Keep progressing. After offering some meltable texture foods, be sure to keep your baby moving along in their feeding journey by offering soft-cooked finger foods as mentioned above. As convenient and palatable as they are, meltable texture foods don’t offer as much in the way of nutritional or caloric value, so use in moderation and continue working towards a variety of finger foods.
- Offer a puree as a dip for finger foods. This can help give a sense of familiarity in texture as your baby continues to explore finger foods.
Combination
You can also do a combination weaning approach where you serve baby both purees and finger foods at the same time.
- If you are doing a combination of offering both purees and finger foods, know that you’ve got options. Some babies may benefit from starting with purees first and be very interested in them, while others may prefer more finger food options and show less preference for purees. Either way is okay, just keep offering a combination of both at least one meal or snack per day.
- Place a few spoonfuls of puree directly on the tray or in a bowl for your baby to dip fingers into. Model how to dip your fingers into the puree and bring them to your mouth, to taste some.
- Offer baby a pre-loaded utensil (NumNum Gootensil) and hold it out for them to grasp or set on their tray.
- Use finger foods as a dipper. You can also offer a soft stick-shaped piece of food, such as a roasted carrot or bread lightly toasted and cut into strips to dip into the puree.
- Offer different “courses” of the meal when using purees and finger foods in the same setting. When baby is first learning to manage different textures in those first 1-2 months of eating, it may be somewhat challenging to seamlessly switch between finger foods and purees during each meal. Consider limiting the amount of times you switch back and forth between finger foods and purees, so that instead of alternating a bite of yogurt with a bite of toast, for example, you offer toast strips first as the “main course” of that meal and later offer yogurt as the “dessert”.
How to Prepare Finger Foods
Below you will find several different ways to prepare fruit, vegetables, grains, proteins and carbohydrates for baby. If I somehow missed your favorite cooking method, then by all means go for it! Here are the general principles around preparing solid foods for your baby.
- Soft Foods: finger foods need to be soft enough that you can squish them between two fingers. You want your baby’s first foods to be soft so they can easily gnaw, suck, chew and move the food around their mouths.
- Cooking Method: some foods are already soft enough for baby as-is: mangos, bananas, avocado, etc. Other hard fruits and veggies will have to be steamed or roasted.
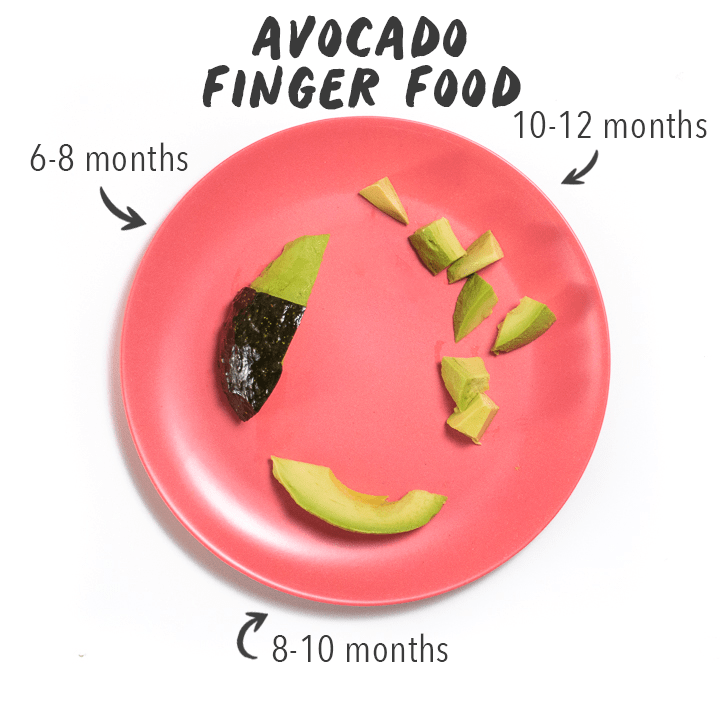
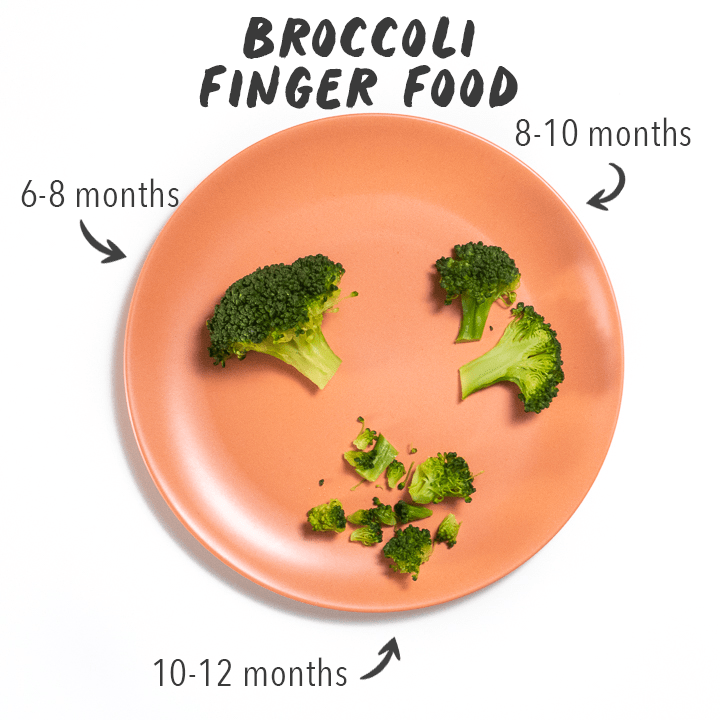
- Sizes to Serve Finger foods: for babies 6-9 months you will want to cut foods into 2-3 inch strips, roughly the size of two adult fingers which makes it easy for babies to use their palmar grasp on. For babies 9-12 months, you can chop foods into small “pea” size pieces for your baby to work on with their pincer grasp (see below).
How to Start Finger Foods with Baby
Ready to serve your baby their first solid finger foods, but not sure exactly where to start? Here are some practical steps you can take to make sure your first feeding is a success.
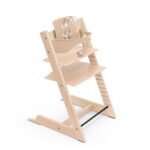
- Always feed your baby in a highchair or booster with good support for their trunk, hips, and feet. Ensure they have a footrest and that hips and knees are positioned as close to 90 degrees as possible.
- Keep it simple and start with 1-3 foods at a time. Avoid putting too large of quantities on the tray or plate. We eat with our mouths as well as our eyes, meaning that sometimes too much food can be visually overwhelming for a beginning eater.
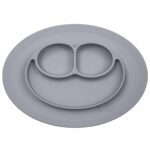
- It’s okay to put food directly on the highchair tray or table. It’s also okay to use those adorable silicone divider plates and bowls you got as baby shower gifts, but know that it’s not mandatory.
- Ideas for good first foods include soft and ripe fruits like banana or avocado, or soft-cooked veggies like sweet potato or carrots. Cut foods into stick-shaped pieces roughly about the width of two adult fingers to make grasping easier. Or hand baby a pre-loaded utensil with one of the above foods pureed on it. See some of our favorite first foods for baby-led weaning below.
- Always follow your baby’s cues and feed responsively. Let baby determine whether or not she wants to eat a portion of food and how much she wants to eat. Allowing your baby to develop and express feelings of both hunger and fullness will set them up for good eating habits later on in life.
Choking vs. Gagging
By far, the biggest concern I hear from parents regarding finger foods is what to do when your baby is choking. Yes, it can be scary and daunting when your little one is gagging on a piece of food. But there is a difference between gagging and choking and most of the time baby is only gagging on food, not choking. One of the best ways to ease the fear of your baby choking is to be prepared. Read the sections below about gagging vs. choking as well as teaching baby how to chew. Cuz you know, knowledge is power! We also recommend you attend a live class in your area or take this online Baby CPR Course.
Although it may still look and feel intense or scary the first time a parent witnesses it, gagging is different than choking.
Gagging
When a baby gags, it is most likely because food that has not been chewed well has gotten too far back in the mouth. The gag reflex is a built-in protective mechanism to protect the airway from food. With practice, your baby learns that they need to chew first, then swallow the food. Fortunately, with continued practice with eating, the gag reflex should lessen over time.
Signs of gagging include:
- sounds, such as coughing or hacking
- baby’s skin may turn red or a darker shade
- baby’s eyes might water
Babies usually recover fairly quickly, and you may see the food come forward in their mouth. Although not as common, vomiting after gagging may happen. During this time, watch closely and do your best to stay calm.
Choking
On the other hand, choking is when a piece of food gets lodged into baby’s throat, cutting off their air supply.
Signs of choking include:
- baby is quiet
- baby’s skin may turn blueish in color
- baby won’t be able to cry or make much sound
Your baby may become unresponsive or lose consciousness if the food is not cleared. This is why it’s recommended to know CPR before starting solids of any kind.
How to Keep Baby Safe
As a parent of two, I know how scary it can be to introduce solid foods to your baby. With the proper precautions and knowledge, the fears will loosen and feeding your baby can become a wonderful adventure for both of you.
- Avoid high-risk choking foods, as noted above.
- Always supervise with food – sit with your baby and try not to multi-task while your baby is eating.
- Baby should be sitting in an upright position for all meals and snacks, not reclined. If your baby starts to get sleepy during eating, remove food.
- No eating in the car seat unless an adult is in the backseat supervising your baby.
- Do not let baby eat on the go. Once your baby is crawling or walking, avoid letting them move around with food in their mouth or holding food in their hands.
- Check the temperature of foods before offering them.
- Check baby’s mouth after they are done eating. Some babies may pocket food in the sides of their cheeks or get food stuck to the roof of their mouth as they are learning to eat. If you see any food remaining, encourage your baby to keep chewing, spit it out if they need to, or take sips of water or milk. Avoid sticking your finger in your baby’s mouth to get the food out – we want baby to learn how to manage taking care of the food. Sticking your finger in your baby’s mouth could also cause the food to get lodged further down in your baby’s throat, making it harder to dislodge.
First Finger Foods for Baby
Not sure which foods to offer first? These 10 foods are nutrient-dense, easy to make and a tasty first food for your baby. For more variety, you can find over 80 more finger foods for your baby to eat and explore down below.
- Avocado: slices or small chunks
- Banana: peeled and in long strips or rolled in crushed up puffs or O cereal.
- Sweet Potatoes: steamed for 10-12 minutes or roasted.
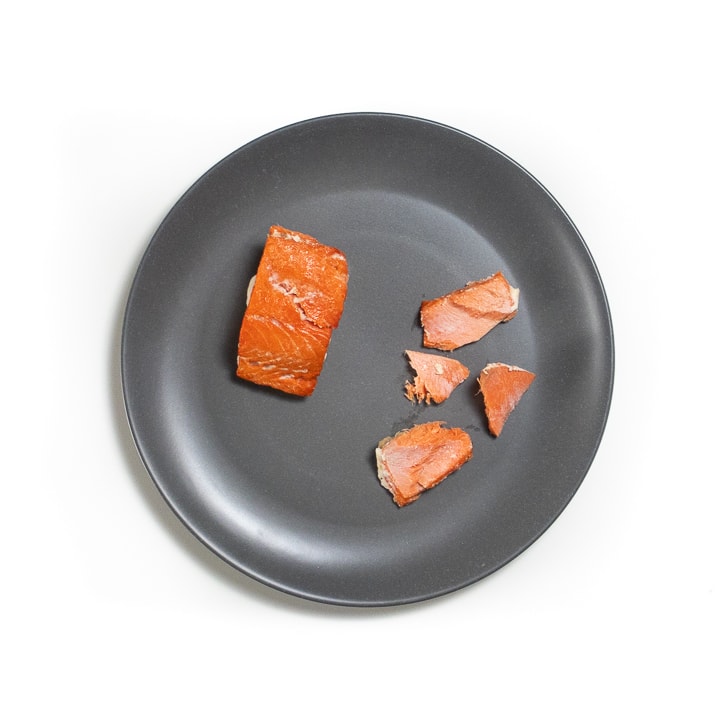
- Salmon: baked at 425 degrees F for 10-12 minutes, remove skin and flake off pieces for baby.
- Broccoli: steamed for 8-10 minutes or roasted.
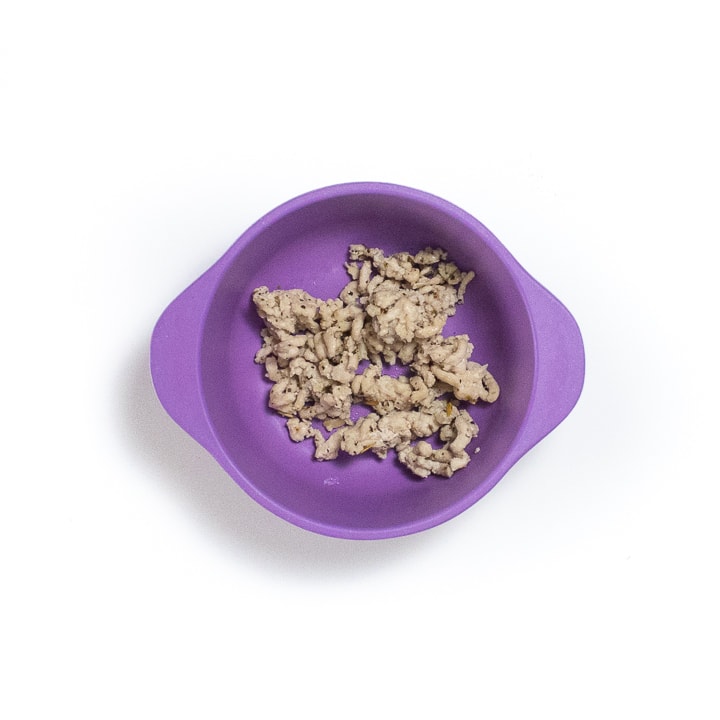
- Meat: in 2-3 inch strips, shredded, ground or chopped into small pieces.
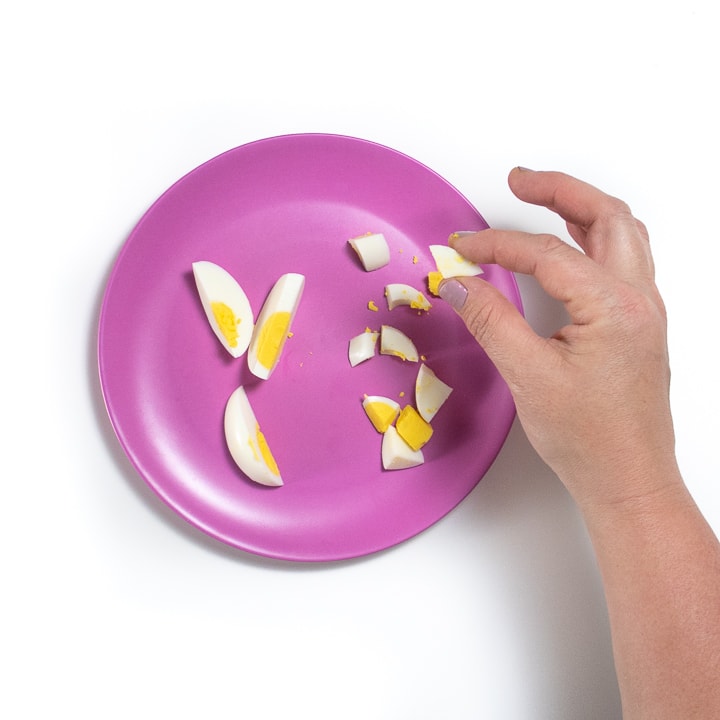
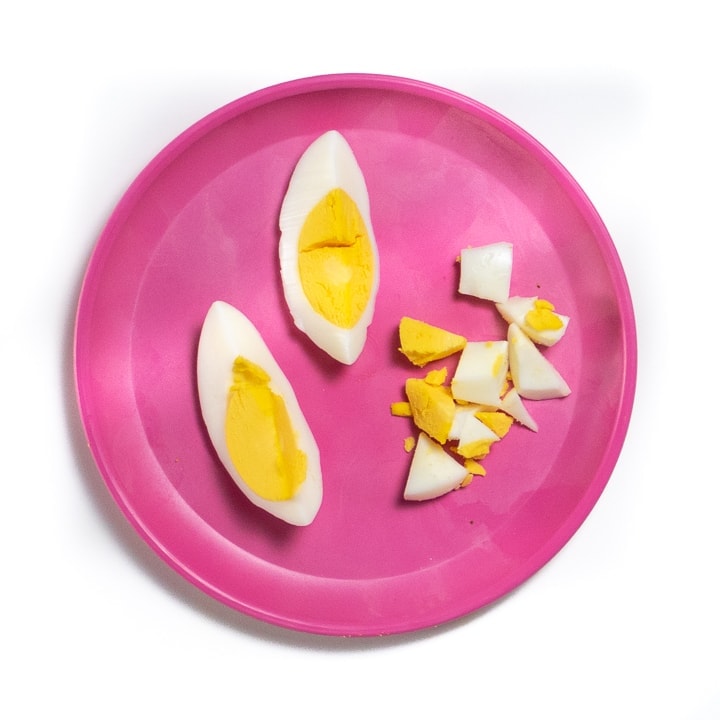
- Eggs: hard-boiled and cut into chunks, omelet strips, or egg cups.
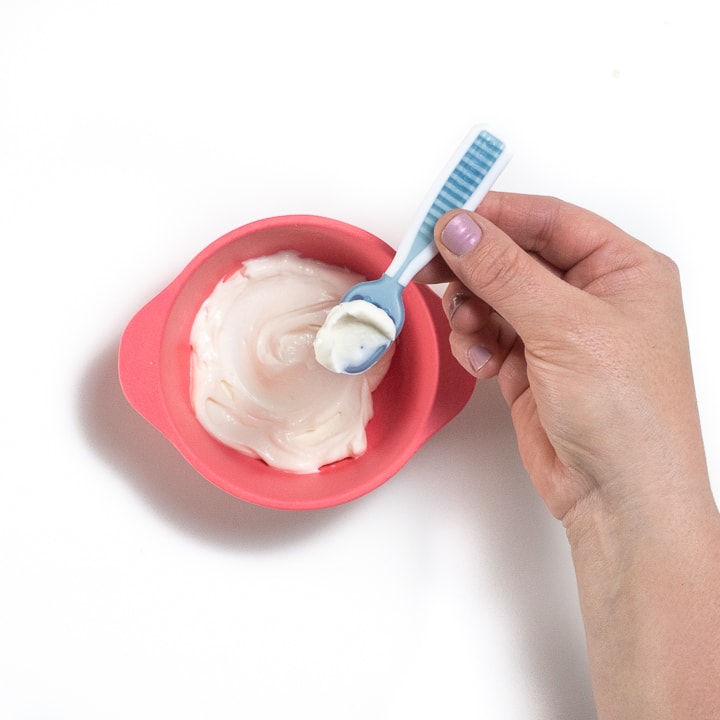
- Yogurt: serve with a self-feeding spoon or let baby explore with their hands.
- Oats: cook and let cool in small round shapes, then serve those round patties to baby.
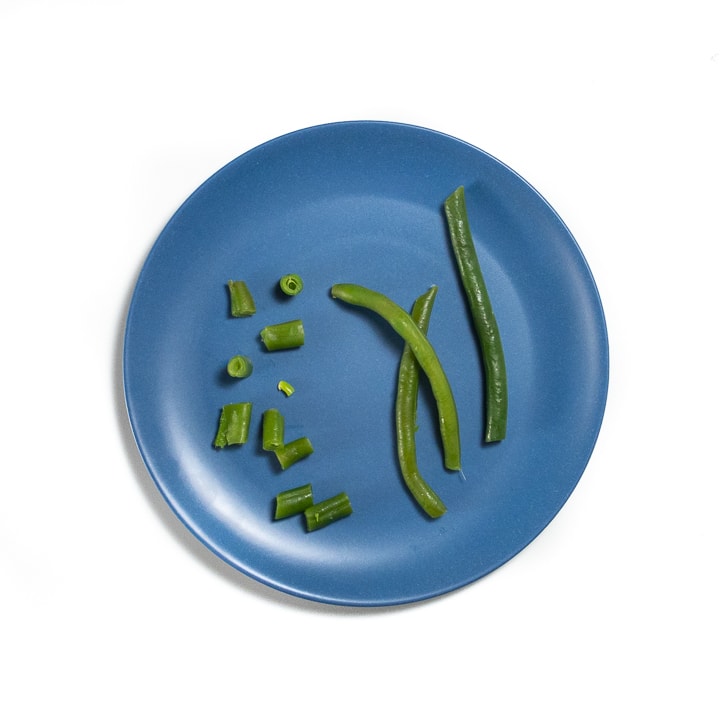
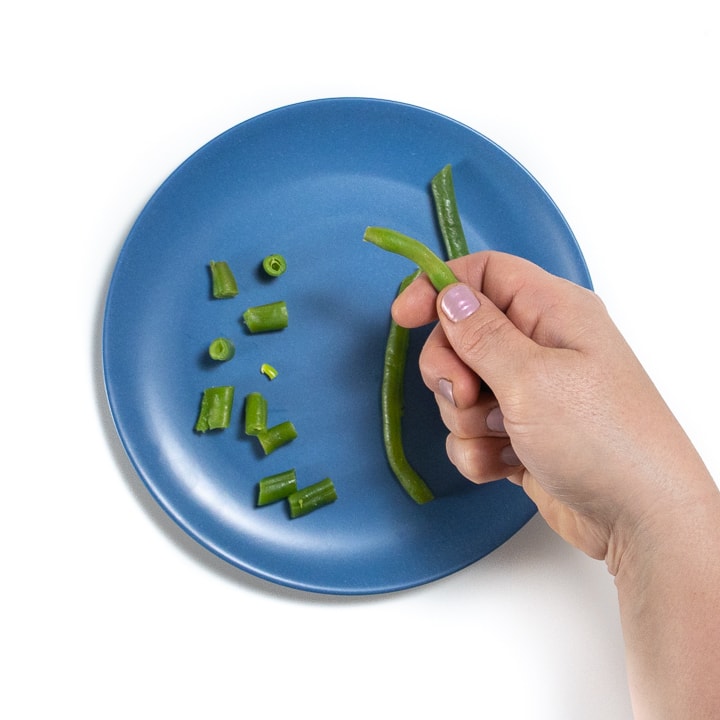
- Green Beans: steamed for 8-10 minutes or roasted.
Iron Tip: it’s a great idea to offer baby iron-rich foods as some of their first finger foods to help build their iron reserves. Try to give iron-rich food at each meal.
Foods to Avoid
There are some foods that pose a high choking risk to your baby, depending on how it’s prepared, so it’s best to avoid these foods until your baby is developmentally ready, which may not be until 2-4 years of age for some foods.(9)
- Hard, raw fruits and veggies (carrots, apples, celery, etc.)
- Whole cherry or grape tomatoes
- Whole cherries, berries, and grapes
- Melon balls
- Dried fruit (raisins, dates, prunes, etc.)
- Whole and chopped nuts, chunks of nut butters
- Large, tough chunks of meat
- Hot dogs and other meat sticks
- Fish with bones
- Large chunks of cheese
- Tough or hard breads
- Cookies, granola bars
- Popcorn
- Hard candy, jelly beans
- Marshmallows
Some other things to be aware of:
- Honey should be avoided until 1 year of age due to the risk of botulism.
- Undercooked foods like eggs or meat, which can pose a food-borne illness risk, should be avoided.
- Cow’s milk should not be introduced until 1 year of age unless used in baked goods.
- Unpasteurized dairy and lunchmeats should not be served due to the risk of listeria.
- Low-fat versions of foods (vs. full fat) should not be served because babies need fat for growth and development.
- Foods high in salt and sugar can be harmful to babies’ health.
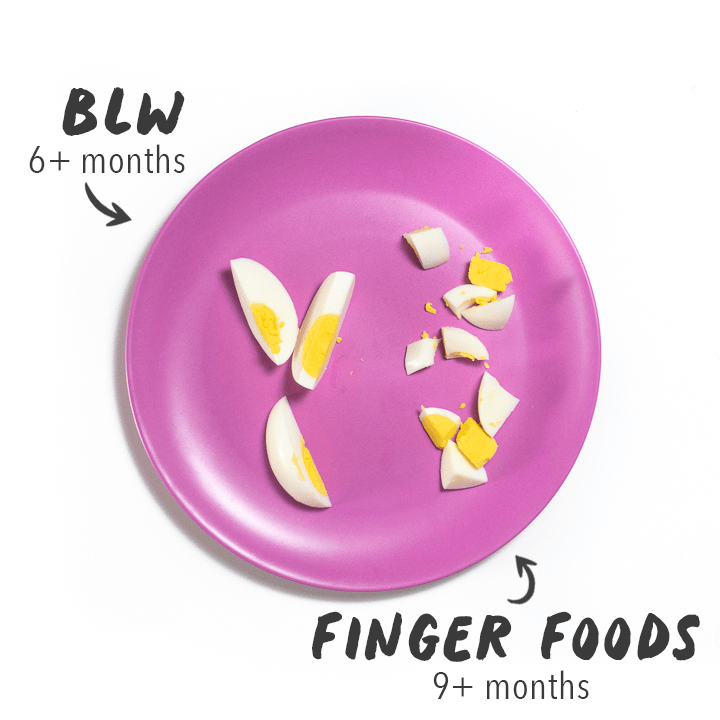
How to Cut Finger Foods for Baby
A good rule of thumb to follow is the younger the baby, the bigger the piece of food. I know it sounds counterintuitive, but the bigger the piece of food, allows your baby to hold onto it while chewing and sucking on it without posing as high of a choking hazard. For babies 6-9 months, you will want to cut food into 2-3′ strips or sticks roughly the size of 2 adult fingers. For babies 9-12 months, you can shred or cut food into ‘pea’ size pieces.
9-12 MONTHS
- Bananas: thin strips of banana that can be rolled in crushed baby puffs or O’s cereal.
- Avocado: thin slices or small chunks of ripe avocado.
- Meat: shredded, thicker strips, ground meat, or long strips of meatballs.
- Sweet Potato: thick wedges or chopped smaller pieces of steamed or roasted sweet potatoes.
- Broccoli: smaller florets or chopped pieces of steamed or roasted broccoli.
- Eggs: serve quartered or chunks of hard-boiled eggs or scrambled eggs
- Apples: cut into slices or chopped into small pieces and steam or sauté until tender.
- Pancakes: serve baby a pancake cut in half or chopped into small pieces.
Sample Feeding Schedule
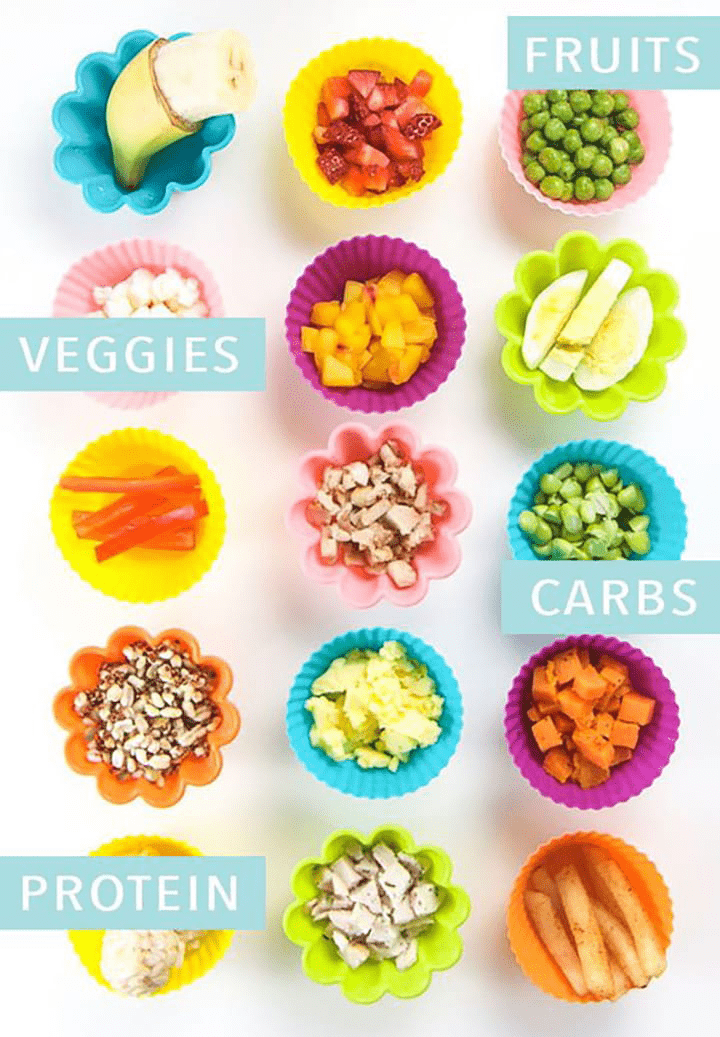
Aim to feed baby a variety of textures and flavors to help expand her palette, which can help reduce picky eating. Try to make sure you serve at least one iron-rich food per meal to help prevent iron deficiency anemia. Please note that there is not one right schedule for every baby so do what works best for your family.
Sample Schedule for 9-10 Month Olds
7am- 7:30am- wake-up, bottle/breastfeed
7:30-8:30am- play
8:30am – 9am- breakfast of Greek yogurt, halved raspberries, whole-grain blueberry muffin bites
9am-10:30am- morning nap
10:30am- 11am- bottle/breastfeed
11am-12pm-play
12pm-2pm- afternoon nap
2pm- 2:30pm- bottle/breastfeed
2:30-4pm- play
4pm-5pm- cat nap
5:00pm- 5:30pm- bottle/breastfeed
5:30pm- 6:00 pm- play
6:00pm- 6:30pm- dinner of ground turkey, baked sweet potato sticks, steamed peas and carrots
6:30pm- bath
7pm- 7:30pm- bottle/breastfeed
7:30 pm-bedtime
Sample Schedule for 10-12 Month Olds
By now, baby should be getting 3 meals a day, in addition to formula or breast milk, which is usually reduced to 4 feedings per day.
7am-7:30am- wake up, bottle/breastfeed
7:30am-8:30am- play
8:30am- 9am- breakfast of scrambled eggs, mandarin orange segments, whole grain pancakes
9am-10am- play
10am-12pm- morning nap
12pm- 12:30pm-bottle/breastfeed
12:30pm-1pm- play
1pm- 1:30pm- Lunch of cut up baked chicken, steamed broccoli and rice
1:30pm-2:45 pm- play
2:45pm- 3pm- snack of whole grain O’s, cut up cheese stick and sliced strawberries
3pm- 4:30pm- afternoon nap
4:30pm- 5pm- bottle/breastfeed
5pm-6pm- play
6pm- 6:30pm- Dinner of cut up spaghetti and meatballs with steamed green beans
6:30pm- bath
7pm-7:30pm- bottle/breastfeed
7:30 pm-bedtime
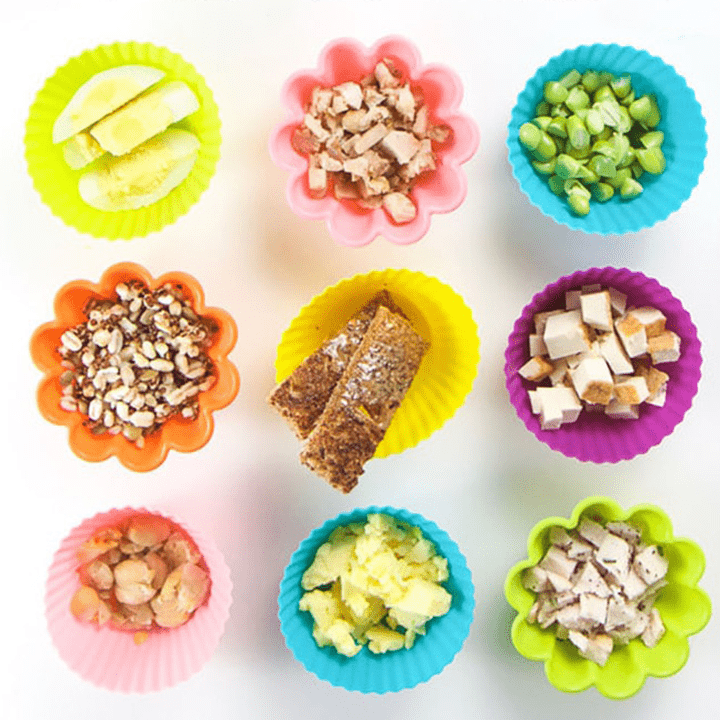
Best Finger Foods for Baby by Age
This is a sample of amazing nutrient-dense foods that are great at these ages. But the goal is to always offer a wide variety of foods, textures and tastes to your baby for the first year.
9-10-Month-Olds
- Halved, quartered or mashed blueberries
- Halved or quartered raspberries
- Thinly sliced strawberries
- Steamed peas or cooked beans
- Whole grain O’s cereal
- Puffs
- Whole wheat pasta
- Ground meat
- Whole wheat bread strips
- Scrambled eggs
- Avocado slices
- Tofu strips or pieces
- Thinly sliced cheese
- Sliced steamed broccoli or cauliflower florets
- Steamed carrot sticks
10-12-Month-Olds
- Scrambled eggs, avocado slices, sliced strawberries, bite-sized pieces of blueberry muffin
- Deconstructed black bean tacos
- Spaghetti and meatballs, cut into bite-sized pieces
- Bite-sized baked chicken, with whole wheat pasta and steamed broccoli
- Baked salmon with steamed peas and carrots and rice
- Bites of thinly smeared peanut butter and sugar-free jelly sandwich
- Pita bread strips with hummus
- Cooked veggie sticks with guacamole
- Cooked apples dipped in Greek yogurt
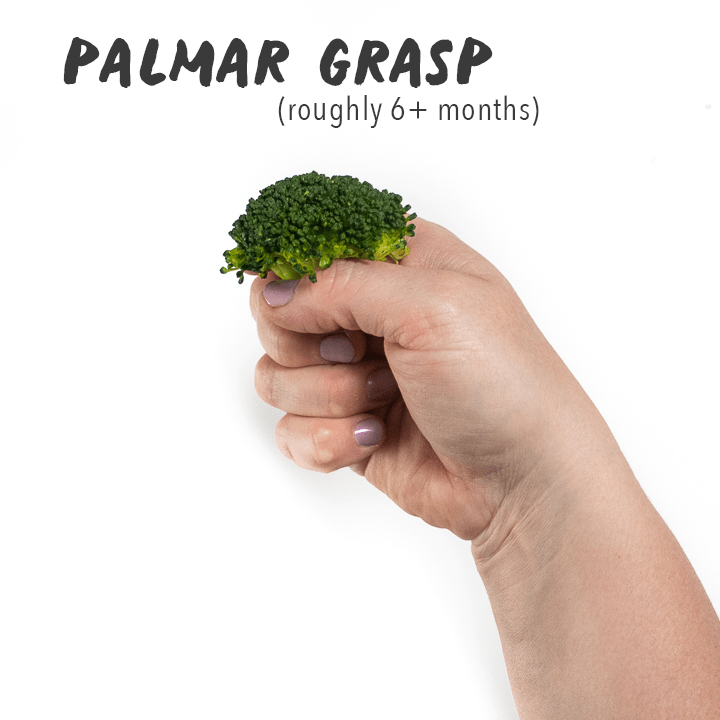
Palmar and Pincer Grasp
So if your baby is supposed to be self-feeding, you might wonder how exactly they will get the food into their mouth? This is where the palmar grasp and pincer grasp come into play. Although having a pincer grasp is not a requirement for starting self-feeding, being able to grasp and bring items, such as toys or hands, to their mouth (a palmer grasp) is needed.
Palmar Grasp
A palmar grasp starts to develop around 5-6 months, making it the first way your baby will move food from their plate to their mouths. This grasp involves all four fingers curling around an object, and the thumb tucked within the palm. The hand begins to accommodate to the shape of an object and touch or “tactile” awareness develops in the hand at this stage.
When using a baby-led weaning or eating approach, this will look like your baby grasping onto stick-shaped foods, with most of the food in the palm of their hand and a small portion of food sticking out of the top of their hand, which is what they will chew on. Or it might look like your baby grasping onto a NumNum Gootensil pre-loaded with a puree to bring to their mouth.
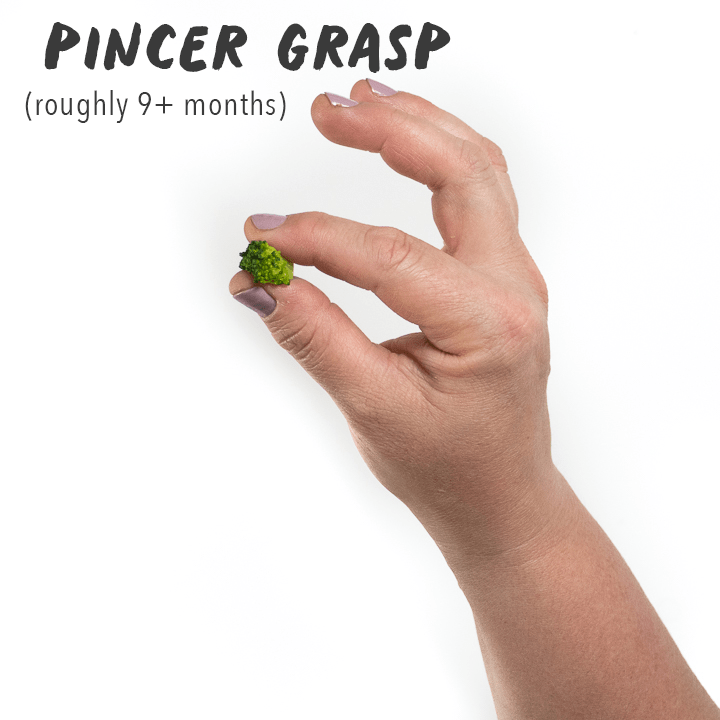
Pincer Grasp
A pincer grasp involves using the tip of the thumb and the index finger to pick up pea-sized foods, such as a cheerio. By 7-8 months, a thumb-finger grasp may be forming, but it may take until the end of your baby’s first year in order to have a well-controlled pincer grasp.
With baby-led weaning, this may start off looking more like a “raking” movement, where your baby straightens and curls their thumb and first two fingers around a small piece of food.
You can continue to offer your baby both larger, stick-shaped pieces of foods and smaller, pea-sized pieces of foods during this time, as your baby will likely switch between using a palmar and pincer grasp, even during the same meal. Eventually baby will progress to using just the tip of their thumb and index finger to pinch as this movement becomes more refined.
How to Teach Baby to Chew
Babies typically begin to mouth or chew on teethers, toys and their hands between 4-6 months. But that doesn’t mean your baby is ready to chew on a piece of steak just yet.
When babies first start chewing, the movement you see is a basic up and down jaw movement, sometimes called munching, that will eventually progress into a mature chewing pattern, called rotary chewing. Throughout this process, babies are also developing side-to-side tongue movements, called tongue lateralization. Tongue lateralization helps your baby push food over to the area where the molars will eventually come in, where the heavy work of chewing happens. As your baby chews the food multiple times, it forms into a little ball or “bolus” of food, which is then transferred to the back of the mouth for swallowing.
Some babies progress along this developmental process of learning to chew and swallow without much assistance, while other babies need a little more help in this area. Parents need to remember that eating is the most complex physical task that children do. In fact, it takes a typically developing child until about 2 years of age to learn to eat a wide variety of foods. The following tips can help build the foundational skills for chewing:
- Offer baby teething toys and encourage baby to move them over to the biting surfaces. This helps with the up and down jaw movements and lateral movements of the tongue needed for chewing. Some favorite teething toys include the Baby Banana Toothbrush, the Comotomo Silicone Baby Teether and ARK’s Textured Grabber. You can also offer utensils such as the NumNum Gootensil or the ChooMee baby spoons as a teether and not just during feeding time.
- Get in a good habit of gently brushing your baby’s gums and first teeth early on. Babies can chew on an infant toothbrush, such as the Grabease double-sided toothbrush.
- Model, model, model. Sit down with your baby during meal times, eat what they are eating, and exaggerate how you are chewing foods. Yes, you might feel a little silly at first, but baby will love watching and learning about where the food goes in your mouth and want to try it too.
- Don’t be afraid to use purees to teach the concept of swallowing first. Purees can be very helpful for teaching how to swallow, as they help intrinsic tongue muscles develop, preparing your baby to chew and swallow more efficiently. It’s also less common to gag or choke on purees, which may help some babies feel more comfortable when starting the feeding process. With purees, you can even place the spoon to the sides of the mouth as you would with a teether or soft piece of food. Just be sure to help your baby progress beyond only purees in a timely fashion and onto more challenging textures of soft finger foods.
- Use appropriate finger foods, such as crackers or biscuits that melt easily, soft cooked veggies cut into strips or fruits that squish nicely, such as avocado or banana. Cutting foods into thin stick or strip shapes can help with placing foods on the sides for chewing.
Difference Between Baby-Led Weaning and Finger Foods?
The main difference between baby-led weaning and finger foods is the age at which you introduce the solid foods to your baby. Baby-led weaning usually starts around 6 months of age and is the feeding style where you would skip the spoon-fed purees stage and move right into solid foods. If you go with the more traditional feeding model, you will introduce your baby to finger foods around 9 months of age after you have already introduced your baby to stage one, stage two, and stage three purees.
Because of this age difference, the shape and sizes of the foods you offer baby may differ slightly as you usually offer bigger pieces of food the younger the baby. All other principles and concepts of baby-led weaning apply to the finger food stage.
Does Baby Need Teeth to Eat?
The question of how babies can chew foods without teeth makes any parent scratch their heads! But in reality, we all chew food with our back molars, not our front teeth, which baby doesn’t get until 18-22 months of age. Good thing babies have super tough and strong gums, which they use to mash, gnaw and chew foods. Baby’s gums are better at chewing food than you would think, and your baby will be able to chew more foods the older they get, even without their molars.
Tips
- Mess: Relax, things will get messy but nothing some paper towels can’t handle. Let baby play with and explore all the new foods. You may want to strip your baby and let her eat naked, so she doesn’t ruin her outfit or use a “catch-all” bib that will help catch any food baby’s mouth misses so it doesn’t all end up on the floor.
- Limit Distractions: make sure your baby isn’t distracted by things like toys, the TV, a pet, your phone, etc., while they are eating.
- Know the difference between choking and gagging: Gagging is a perfectly normal part of trying new foods but can easily be mistaken for choking. A gagging baby will be able to make noise, such as coughing, but a choking baby will look terrified, won’t be able to cough, and may have blue lips.
- Serve Soft Foods: Foods should soft enough so that they can “squish” with gentle pressure between your thumb and index finger. Not so soft that they fall apart in your baby’s hand, but soft enough so that no hard, small pieces break off. Most people think about steaming or cooking vegetables only, but keep in mind this will mean that you’ll also need to steam some fruits, too, depending on what you are offering.
- Same Meal… Sort of: While one of the biggest perks of getting to the finger foods stage with your baby is that they can eat the same foods as you… sort of. While the goal is to have one meal for the entire family, you will want to hold the salt, hot spices, store-bought sauces, and sugar to their foods. For the first couple of months, this may mean making a meal without those ingredients and then adding them to the grown-up options – make pasta with broccoli but hold the sauce for baby, cook a stir fry but hold the sauce until you have a portion for baby, etc.
- Give Baby a better grip as needed: Roll slippery or hard to grasp slices of soft foods, such as avocado or banana strips in finely crushed crumbs, such as those from plain cheerios or teething biscuits. Or you can leave the peel on a portion of a banana and avocado to help baby grip them better.
- Serve Food in Different Ways: Experiment with offering the same food in different ways – for example, your baby could try raspberries plain one day, pureed and stirred into oatmeal with nut butter the next day, and smashed with cream cheese on top of toast another day.
- Establish a schedule: make a plan for when you will offer eating opportunities. Ideally, this will be close to, or at the same time that the rest of the family is eating, but making a plan ahead of time for when you’ll offer foods can still be helpful. You can start by offering 1 or 2 eating opportunities a day between breast or bottle feeds and slowly progressing to 3 meals and 1-2 snacks from there.
- Be present with baby: Sitting down and eating with your baby is not only good practice for safety, but it’s also good practice for modeling good eating habits.
- Consider temperature: some babies prefer room temp, while others might like a cooler or slightly warm foods.

Vegetable Finger Foods for Baby
Below you will find over 24 different vegetables perfect for your baby’s first finger foods and multiple ways you can cook and serve them.
3 Tips for Serving Veggies to Baby
- Add Flavor: while you can serve plain veggies to baby, I love serving vegetables to my kiddos with added healthy fats and complementary spices. My theory is that the better they taste, the more they will eat 🙂
- Cook Veggies for Easy Eating: You will need to cook most vegetables for them to be soft enough for babies to eat. Below, you will find my recommended cooking methods and spices that I love to add to each vegetable. If you have a favorite way to cook a vegetable or have a favorite spice you like to add in, then by all means, make them and serve it to your baby that way. And then, please share your amazing recipe with the rest of us in the comments below. Fresh or frozen veggies can be used for these recipes.
- Eat with Baby: let me also mention that you don’t have to make these veggies just for your baby. I would always make a big batch of cooked veggies for my baby’s meal and my own meal. Finger foods do not need to be boring. I was happy to be able to say I had baby food for dinner!
The Veggie List
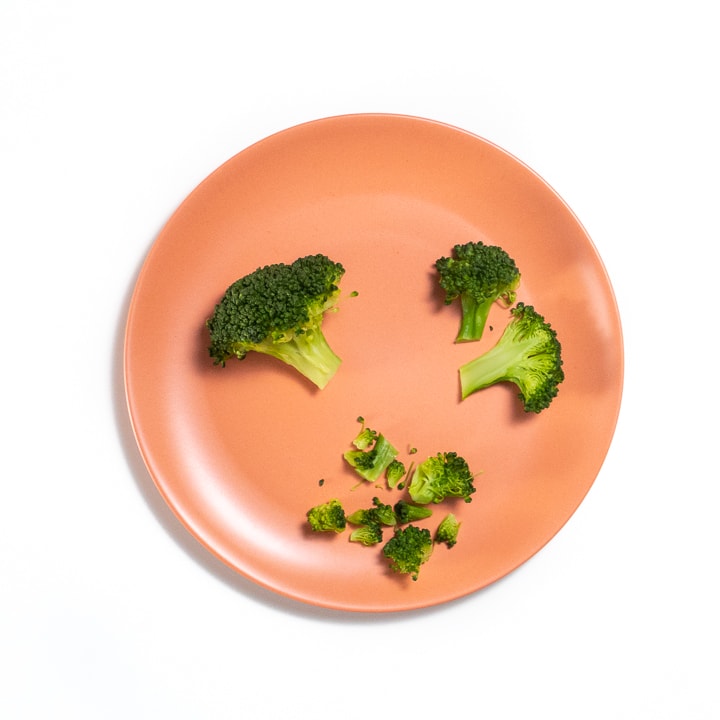
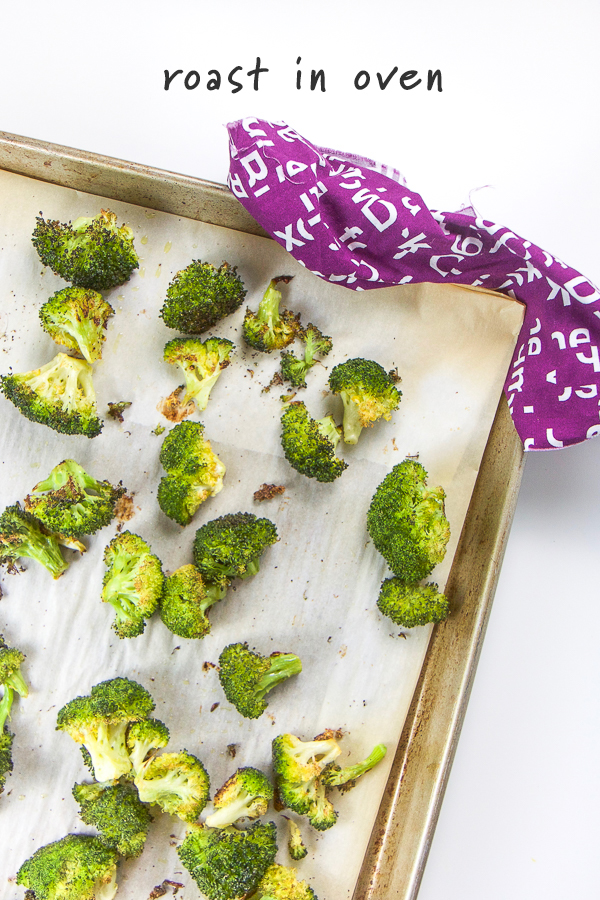
Broccoli: cook by gently steaming for 7-10 minutes or by roasting the florets in a little olive oil at 425 degrees F for 20 minutes or until just tender. Serve chopped into small pieces or in tall, skinny, and flat florets (cut florets lengthwise in half). Serve plain or add a drizzle of olive oil or coconut oil and a sprinkle of garlic, lemon juice, cumin, or even a pinch of Parmesan to the broccoli before serving.
Peppers (Red, Yellow, Orange, or Green): serve raw or gently steamed in long 2-3 inch strips, thicker wedges, or in small “pea” size pieces.
- Corn: serve cooked and on the cob for babies 6-12 months, with a cut down each row of corn kernels. Just make sure the kernels are soft enough to mash with 2 fingers. Serve plain or with a drizzle of butter, olive oil, or coconut oil and a tiny sprinkle of garlic powder, paprika, chili powder, or onion powder to corn before serving.
- Zucchini: cook by gently steaming for 2-4 minutes and chopped into small pieces or 2-3 inch strips. You can also slice zucchini into spears and sauté them in a pan with some grass-fed butter, olive oil, or coconut oil until just tender.
- Asparagus: cook by gently steaming for 6-8 minutes or by roasting them in a little olive oil at 400 degrees F for 15 minutes or until just tender. Serve chopped into small pieces or in 2-3 inch strips (you can cut these strips in half lengthwise for younger babies). Serve plain or with a pinch of lemon zest, parsley, thyme, or chives.
- Cauliflower: cook by gently steaming for 7-10 minutes or by roasting them in a little olive oil at 425 degrees F for 20 minutes or until just tender. Serve in big florets or chopped into small pieces. Serve plain or with a pinch of tarragon, parsley, paprika, tandoori or fresh lemon juice.
- Tomatoes: serve raw and cut into quarters or eighths or roast and serve in wedges.
- Radishes: steam for 6-10 minutes and serve in quarters or thin slices, serve raw and chopped in very small pieces or grated.
- Spinach: saute in a little olive oil and garlic for 1-2 minutes and then serve chopped or mixed with egg, yogurt, oatmeal or ricotta cheese.
- Kale: saute in a little olive oil for 4-5 minutes before misting a little lemon juice ontop, and then serve chopped or as a whole leaf.
- Sweet Potatoes: cook by steaming for 7-9 minutes or roasting them in a little olive oil at 425 degrees F for 30 minutes or until just tender. Serve chopped into small pieces or in 2-3 inch strips (like fries). Serve plain or with a pinch of paprika, cinnamon, cloves, thyme, Italian seasoning, or garlic powder.
- Parsnips: great when peeled, chopped, and tossed in a little olive oil or coconut oil and roasted at 450 degrees F for 30-40 minutes. Serve chopped into small pieces or cut into 2-3 inch strips (think parsnip fries here). Serve plain or with a pinch of thyme, rosemary, paprika, garlic powder, or cumin.
- Beets: cooked and then cut into 2-3″ strips or ‘pea’ size pieces.
- Carrots: cook by steaming for 10-12 minutes or by roasting them in a little olive oil at 400 degrees F for 30 minutes or until just tender. Serve chopped into small pieces or in 2-3 inch strips. Serve plain or with a pinch of dill, garlic, thyme, a drizzle of balsamic vinegar, nutmeg, or parsley.
- Peas: cook by gently steaming for 3-4 minutes or by sautéing them in a little grass-fed butter or olive oil in a skillet for 2-3 minutes. You can also thaw frozen peas in the microwave with a splash of water until warm. Serve plain or with a pinch of cumin, mint, cardamom, or with a splash of lemon juice.
- Cucumber: serve raw in small pieces or 2-3 inch strips or longer 5-6 inch spears with seeds removed. Peeling the cucumber will make it easier for baby to chew.
- Green Beans: cook by steaming for 6-8 minutes or by sautéing them in a small pan with a drizzle of olive oil for 3-4 minutes, or until tender. Serve chopped into small pieces or in 2-3 inch strips. Serve plain or with a pinch of garlic, parsley, cumin powder, mild curry powder, or a splash of lemon juice.
- Winter Squash (butternut, acorn, etc): cook by steaming the squash (peel and de-seeded) for 10-15 minutes or by roasting the chopped squash lightly coated in grass-fed butter, olive oil, or coconut oil in the oven at 400 for 25-30 minutes or until completely tender. Serve chopped into small pieces or in 2-3 inch strips. Serve plain or with a pinch of thyme, rosemary, chives, garlic powder, cinnamon, or cloves. Squash can either go savory or sweet, so try them both ways and see if your baby prefers them one way or another.
- Pumpkin: cook by steaming the pumpkin (peel and de-seeded) for 10-15 minutes or by roasting the chopped pumpkin that is lightly coated in grass-fed butter, olive oil, or coconut oil in the oven at 450 for 25-30 minutes or until completely tender. If you don’t want to purchase an entire pie pumpkin for finger foods, I have found that most grocery stores have pre-chopped and packaged pumpkin chunks during the fall months. Serve chopped into small pieces or in 2-3 inch strips. Serve plain or with a pinch of thyme, rosemary, chives, garlic, or tarragon for a savory flavor. For a sweet flavor try adding a pinch of cinnamon, cloves, or nutmeg.
- Potatoes: cook by steaming, boiling, mashing, or roasting the potatoes. There are a ton of different ways to cook potatoes, but one of our favorites is to cut new potatoes or fingerling potatoes into quarters (the long way so they are more like strips than chunks), toss in a little olive oil or coconut oil along with garlic, rosemary, pink salt, pepper, and a little paprika and roast at 450 for 20-25 minutes or until tender.
- Turnips: great when peeled, chopped, and tossed in a little olive oil or coconut oil and roasted at 450 for 30-40 minutes. Serve chopped into small pieces or cut into 2-3 inch strips. Serve plain or with a pinch of thyme, rosemary, paprika, garlic powder, or an Italian seasoning mix.
- Mushrooms: cook by sautéing the mushrooms with a little grass-fed butter, olive oil, or coconut oil in a pan for 4-5 minutes. Serve in long thin strips or in small pieces.
- Eggplant: cook by sautéing chunks of eggplant for 10 minutes in a little olive oil.
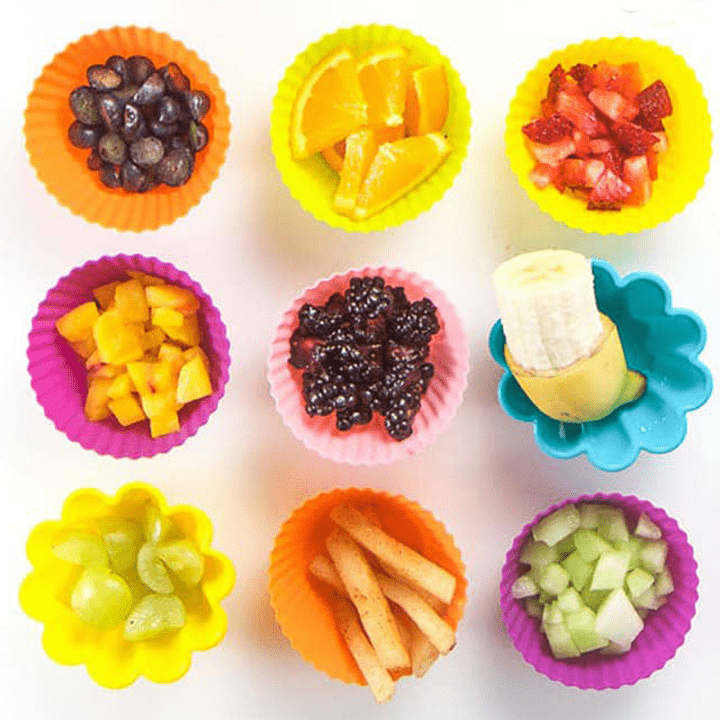
Fruits for Finger Foods
Below you will find over 20 different fruits you can serve to your baby as finger foods. Fruit is a great option for easy finger foods for your baby because most fruit doesn’t need to be cooked before serving to yourbaby.
3 Tips for Serving fruit to baby as a finger food
- Easy to Serve: fresh fruit is by far the easiest finger food to feed your baby. The reason is that for the most part, fruit does not have to be cooked in order for your baby to enjoy it. This makes it the perfect finger food to bring with you while you are spending the morning at the park, traveling or when you need a meal for baby in the next 10 seconds before baby completely losses it on you:).
- Easy to Eat: fruit is filled with a ton of essential vitamins and minerals and is naturally sweet so babies tend to love eating it, which makes your life a little bit easier. If your little one isn’t into the veggies yet, then serve fruit. Yes, it has more natural sugars in it, but this is usually not too much of a concern because the fiber found in fruit helps to slow down the digestion of the sugar. Fruit also has the same essential vitamins and minerals found in veggies.
- Fresh or Frozen: feel free to use fresh or frozen fruit for finger foods. Make sure to thaw and pat dry any frozen fruit before serving.
The Fruit List
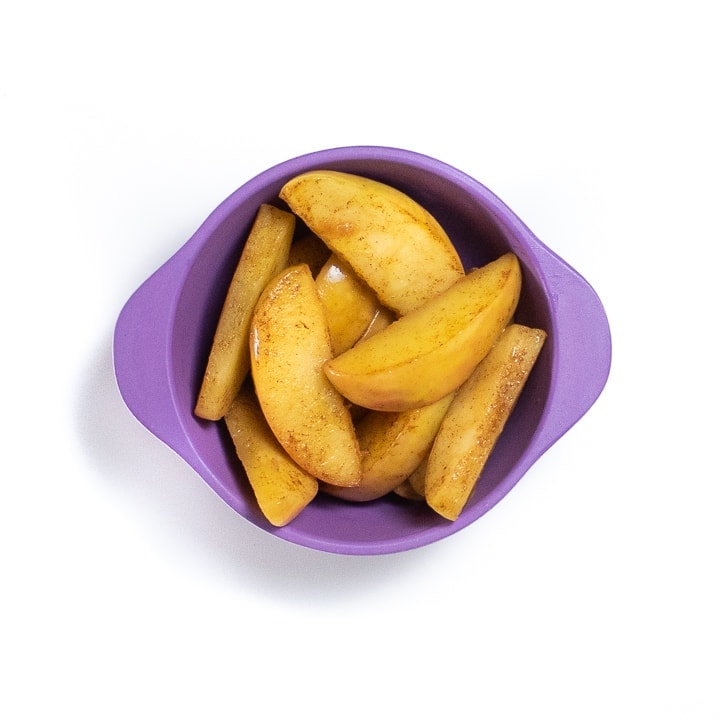
- Apples: sauté apple slices in a little coconut oil or butter and a sprinkle of cinnamon for 1-3 minutes for a fun warm treat. Can serve in thin slices, grated, or in small pieces.
- Honeydew: ripe and finely chopped, or thin slices.
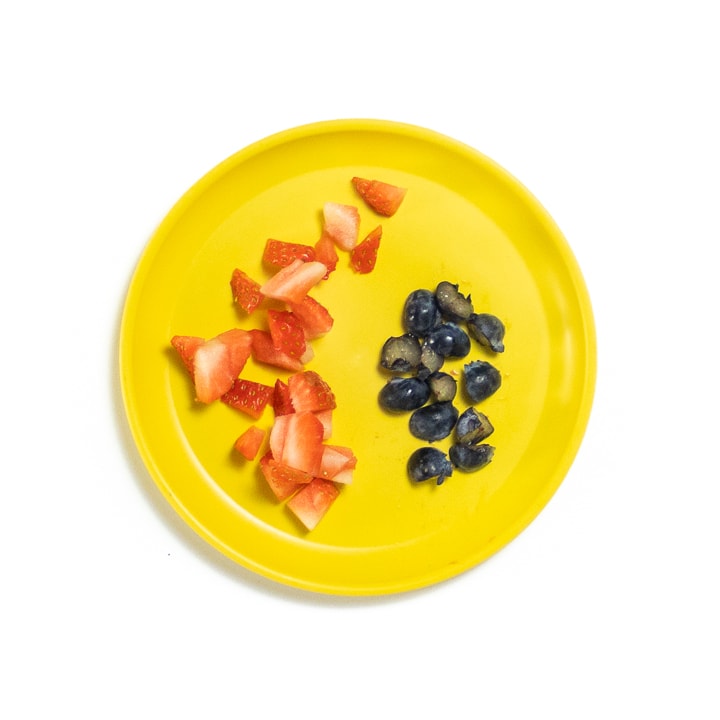
- Strawberries: finely chopped, or cut into quarters or thin slices.
- Blueberries: cut in half or quarters. Or just thaw frozen blueberries.
- Peaches: ripe, served whole, in thick slices, halved with pit removed or as a puree.
- Nectarines: ripe, peeled, and served cut in half, chopped into small pieces, or cut into 2-3 inch strips.
- Plums: ripe, pitted and cut in half and finely chopped or cut into 2-3 inch strips.
- Raspberries: cut in half or quarters.
- Pineapple: served finely chopped or in the ring form.
- Kiwi: ripe, peeled, and finely chopped.
- Oranges: can be served peeled and finely chopped or in quarters with the peel on. I found leaving the peel on gave the little ones a nice way to grip the orange.
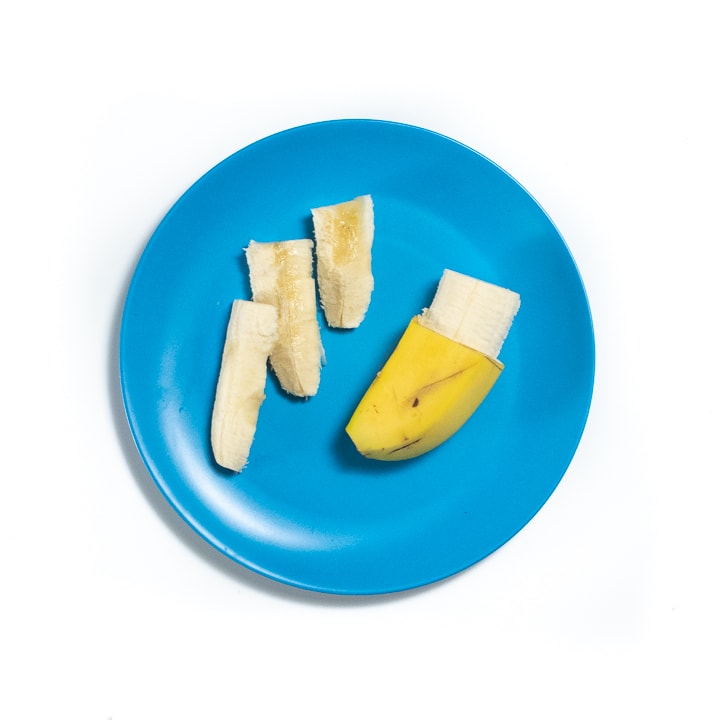
- Banana: can be served peeled and finely chopped, segmented in thirds longwise, or by leaving the stem on and peeling 2-3 inches of the banana peel back. This method gives the little ones a nice way to grip the banana.
- Blackberries: whole and gently smashed with the back of a fork, cut in half or quarters.
- Grapes: cut in half or quarters lengthwise.
- Mango: ripe and finely chopped or cut into 2-3 inch strips. You can also hand baby the mango pit to suck on.
- Pear: ripe, peeled, and finely chopped or cut into 2-3 inch strips. If the pear is too hard, sauté the pear slices in a little coconut oil and a sprinkle of nutmeg for 3-5 minutes or until soft.
- Cherries: pitted and cut in half or quarters. Rainer cherries tend not to be as messy;). I would not recommend serving maraschino cherries as those have been highly processed and are high in added sugar.
- Apricots: ripe, cut off of the pit and served in half, slices, or finely chopped
- Watermelon: ripe and finely chopped or cut into 2-3 inch strips. You can also give them a pie-shaped piece with the rind on for your baby to hold onto.
- Cantaloupe: ripe and finely chopped or thin slivers.
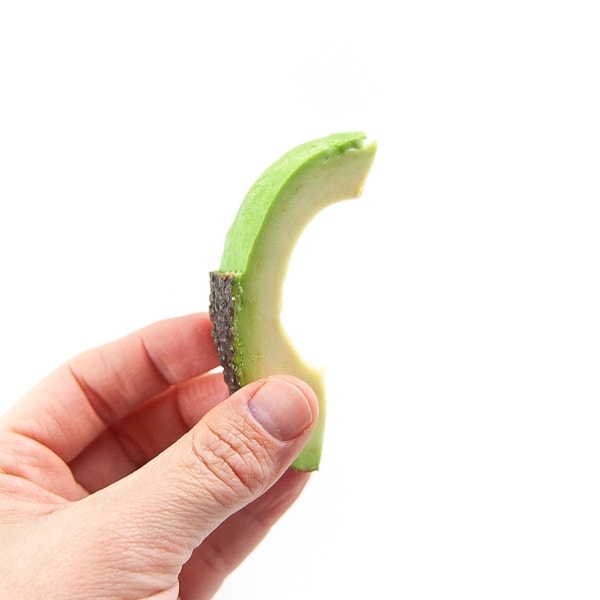
- Avocado: ripe, peeled, and chopped into chunks (can’t be too small of pieces or they won’t be able to pick them up) or cut into 2-3 inch strips with half of the peel on for an easy grip.
- Papaya: ripe, peeled, and finely chopped or in long strips.
Protein
While the best source of protein for your baby for the first year of their life is through breast milk or formula, it is still essential to introduce protein-rich foods to your baby early on. Protein is a major building block that is essential for proper growth and development in babies and toddlers. It helps increase muscle mass, repair muscle tissue and is present in your baby’s blood, organs and skin.
With that said, your baby doesn’t need a protein-centered diet like the fad diets out there for adults today. A little protein at every meal along with a heavy offering of other vegetables and fruits and grains is usually a good fit for most babies.
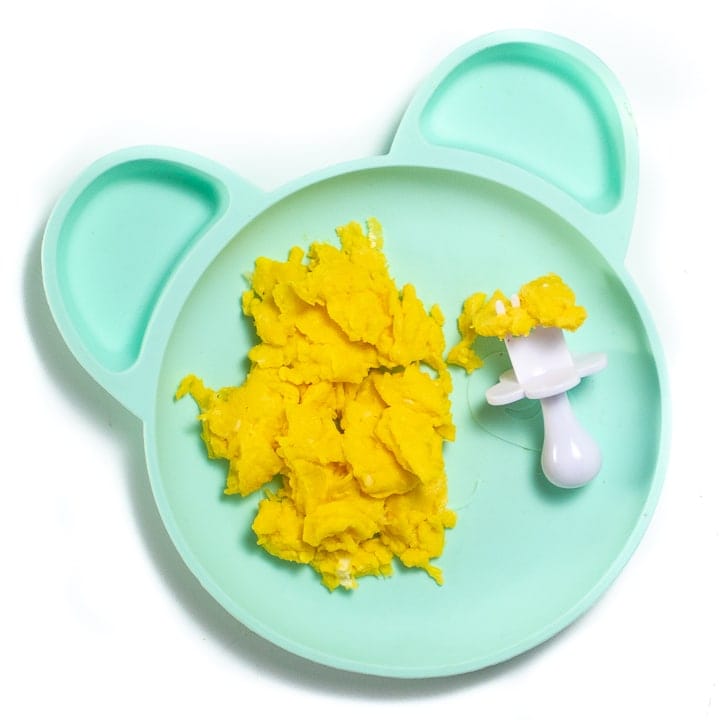
- Scrambled Eggs: go with the entire egg unless someone in your baby’s immediate family has an egg allergy, then just use the yolk. Scramble plain or with a little cheese, hard-boiled chopped or quartered, or serve omelet strips.
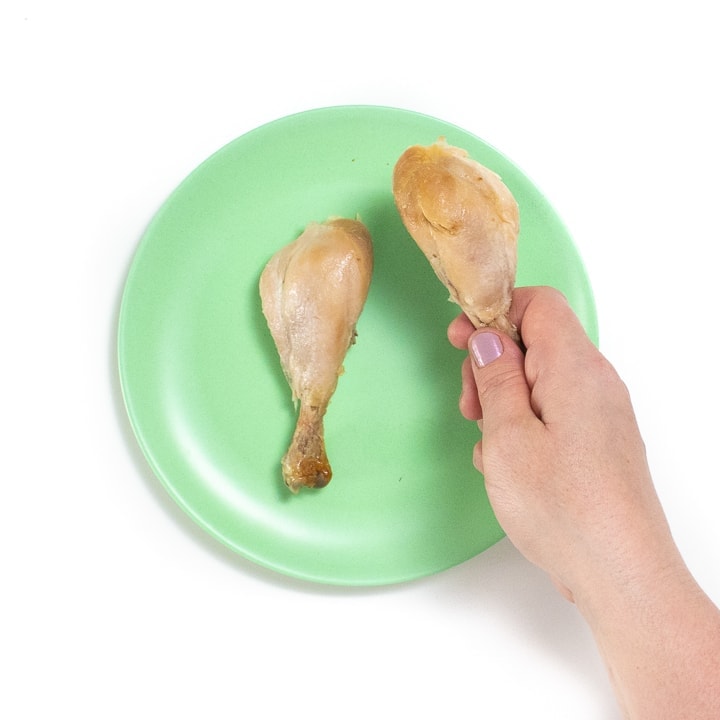
- Chicken: roasted, baked, or grilled. Serve chopped in small pieces or cut into 2-3 inch strips. I love to toss my chicken into homemade pesto sauce or add some paprika, garlic and lemon juice before cooking for a little extra flavor.
- Turkey: roasted, baked, or grilled. Serve chopped into small pieces or cut into 2-3 inch strips.
- Sliced Cheese: cheddar, gouda, swiss, etc. Have fun serving different slices of cheese to your baby.
- Black beans: cooked or canned, strained, and dried completely. Serve by cutting beans in half or quarters or gently mashed between your fingers. Black beans are great with a sprinkle of cumin, garlic powder, or mild chill powder.
- Chickpeas: cooked or canned, strained, and dried completely. Serve chickpeas by mashing them gently with the back of a fork or between your fingers so that your baby can have an easier time picking them up. Serve with a dash of cumin, paprika, or garlic powder for a fun flavor.
- Hard-boiled Eggs: served chopped or in quarters. Serve plain or with a pinch of cumin or paprika.
- Tofu: pan-seared or baked. Serve by chopping into small pieces or cut into 2-3 inch strips. When shopping for tofu, look for sprouted tofu as it has the most nutrients for your baby.
- Salmon: bake in the oven at 400 degrees F for 10-12 minutes or until cooked all the way through, discard skin and gently flake off pieces of salmon with a fork (make sure there are no bones present). You can also serve canned salmon, just look for low sodium varieties. Canned salmon can be served as is or made into salmon cakes/patties.
- White Fish: bake in the oven at 350 degrees F for 10-12 minutes or until cooked all the way through, discard skin and gently flake off pieces of fish with a fork (make sure there are no bones present).
- Beef: see the guide for my favorite recommendations. Serve chopped into small pieces, ground, or cut into long 3-4 inch strips.
- Ricotta: serve spread on a soft piece of toast.
- Edamame: de-podded, cut into quarters, or mashed with the back of a fork or with your fingers.
- Feta: serve the big crumbles or buy the block of feta and slice of long strips or chunks.
- Shrimp: cook your favorite way. Serve by chopping the meat of shrimp into bite-sized pieces. For more advanced finger food eaters, you can serve whole deveined and peeled shrimp.
- Lentils: serve cooked, drained, and cooled. Can serve whole or mashed with your fingers or fork.
- Meatballs: cooked turkey, beef, chicken, or lamb meatballs. Serve chopped into quarters or crumbles.
- Ground Meat: can be turkey, beef, lamb, pork, or chicken. Sauté in a pan until cooked and add in your favorite seasoning. Try to have some bigger clumps of cooked meat because they are easier for your little one to grab onto.
- Sausage: use a good quality sausage for your baby with only a few added ingredients. Cook your favorite way, and then peel off any causing and chop into small pieces.
- Eggs some other ways: omelets, frittatas or cups. These are all great options where you can add in other veggies and cheeses into. Serve cooled and cut into strips.
- Nut Butters: serve spread on a piece of soft toast, mixed into yogurt, applesauce, apple puree, or oatmeal.
- Hummus: served on a piece of bread or on a plate for baby to dip soft veggies into.
Whole Grains
Carbohydrates, found in fruits, vegetables, dairy, grains, and legumes, are essential for your baby’s proper growth and development and are their main fuel source. When choosing grains for your baby, it’s best to choose whole grains, such as quinoa, whole wheat flour, brown rice, farro, and barley, as they are more nutritious than refined grains.
- Rice balls: I have found that rice balls are easier for a baby to handle than just grains of rice, but you can serve rice any way you want. To make rice balls, cook rice and let cool slightly. Then with wet hands, take a teaspoon or two of rice and roll it in the palm of your hand pressing gently until a rice ball forms.
- Quinoa: cooked, cooled and served plain or mashed with avocado, yogurt or cooked oatmeal and served on a self-feeding spoon.
- Bread/Toast: whole wheat or sprouted grains are the best, with no added honey. Serve finely chopped or in long palm-sized strips.
- Oats: Make them into oatmeal and then spoon them into clumps before letting them cool so your baby has an easier time scooping them up.
- Waffles: homemade or store-bought whole grain is the best.
- Millet: cooked, cooled and served plain or jazzed up into a delicious vegetable ‘fried’ millet rice or these millet cakes.
- Farro: one of my favorite grains for a baby because it is big enough for most babies to pick up on their own. Cooked, cooled, and served plain or with a drizzle of olive or coconut oil and a pinch of cilantro, basil or oregano mixed in.
- Pancakes: whole grain is the best for your baby. Serve plain, with a spread of nut butter, ricotta or Greek-style yogurt on top. Serve in strips.
- Pasta: whole wheat, rice, lentil, chickpea, or quinoa pasta is a good choice for your baby. Cooked to al-dente, cooled, and served plain or with your favorite tomato sauce, spinach pesto, or with a drizzle of olive oil and a sprinkle of cheese.
- Couscous: whole wheat couscous is a great option for your baby and can be found in most health food stores, but regular couscous will also work. Cooked, cooled, and fluffed with a fork. Serve plain or with a drizzle of butter and a pinch of mild curry powder mixed in.
- Barley: cooked, cooled, and served to baby plain or with a pinch of parsley, cilantro or dill mixed in. Is also fun to add in a little Greek yogurt or smashed avocado.
- Chia Seeds: made into a chia seed pudding and served on a self-feeding spoon.
Get the recipe: Guide to Finger Foods for Baby: Roasted Broccoli
Ingredients
- 1 cup broccoli florets
- 1 tsp olive, avocado, or coconut oil
- 1 pinch garlic powder (optional)
Instructions
- Prep: Preheat oven to 425°F. Line a baking sheet with parchment paper or a silicone mat.
- Toss Broccoli: Place the broccoli florets onto the baking sheet. Drizzle the broccoli with the oil and sprinkle with a pinch of garlic powder. Toss the broccoli with your hand or tongs until the broccoli is well coated in the oil.

- Bake: Place the baking sheet in the oven and roast for 15-20 minutes or until tender when pricked with a fork. Let cool.
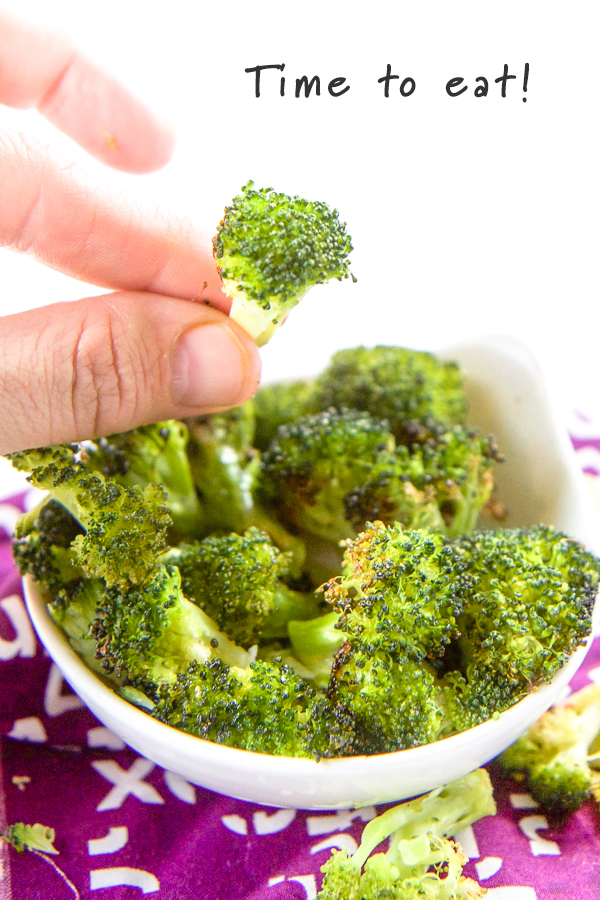
- Serve: You can serve the broccoli to baby and toddler in 2-3” strips or chop them into small ‘pea’ size pieces.

Notes
Did you make this recipe?
Tag @babyfoode on Instagram and hashtag it #babyfoode!
(1) World Health Organization. (2020, Aug 24). Infant and young child feeding.
(2) Coulthard H, Harris G, Emmett P. Delayed introduction of lumpy foods to children during the complementary feeding period affects child’s food acceptance and feeding at 7 years of age. Matern Child Nutr. 2009;5(1):75-85. doi:10.1111/j.1740-8709.2008.00153.x

73 Comments on “Ultimate Guide to Finger Foods for Baby”
Thank you for sharing your expertise; your posts are a valuable resource. Great source about babied food.
Thanks so much!
Thank you soo much! There is so much helpful information here, thank you for sharing 🙂
As always this post is spot on! Thanks for the tips and the ideas! My 10 month old is loving your purées but like your youngest child, she has been ready for solids since she was teeny tiny, just grabbing at our food and staring at us while we ate. So needless to say she has been ready for solids for quite some time. I scratch my head trying to think of new foods to feed here and so happy to think of and picture cherry tomatoes and hummus and cucumbers! Thank you!!