Kids Chocolate Stirring Spoons (Allergy-Friendly)
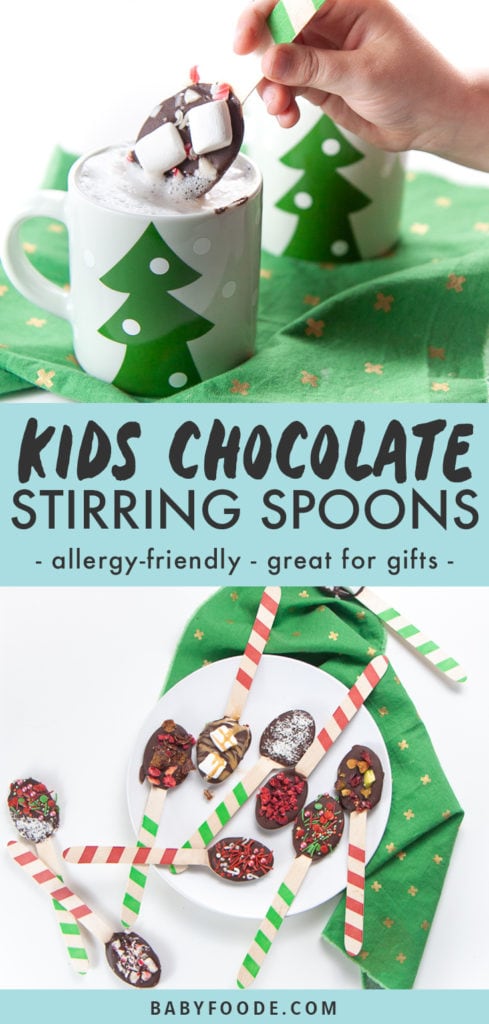
These Kid-Friendly Chocolate Stirring Spoons are made with healthier and allergy-friendly ingredients and are the perfect holiday treat for kids of all ages. They also make great gifts for teachers, neighbors, friends and co-workers! Plus, I give you a list of 25 fun and delicious toppings that you can sprinkle on top ✨!

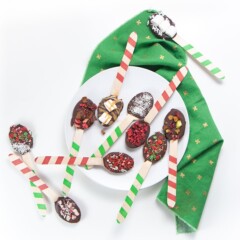
Healthy Chocolate Stirring Spoons
Looking for the perfect (and easy) holiday gift you can share with your friends, neighbors, teachers or co-workers? Or prehaps you are looking for a fun and healhty “cooking” project for you and the kids?
Then these cutest-ever Chocolate Stirring Spoons are totally for you 🙌!
Made with easy-to-find ingredients and in less than 15 hands-on minutes.
They make for a great cooking project that the whole family can help with! Sure, it’s messy and your kid’s hands, face, and possibly entire body will be covered in chocolate🙈, but isn’t spending time with the family what the holidays are about anyway?
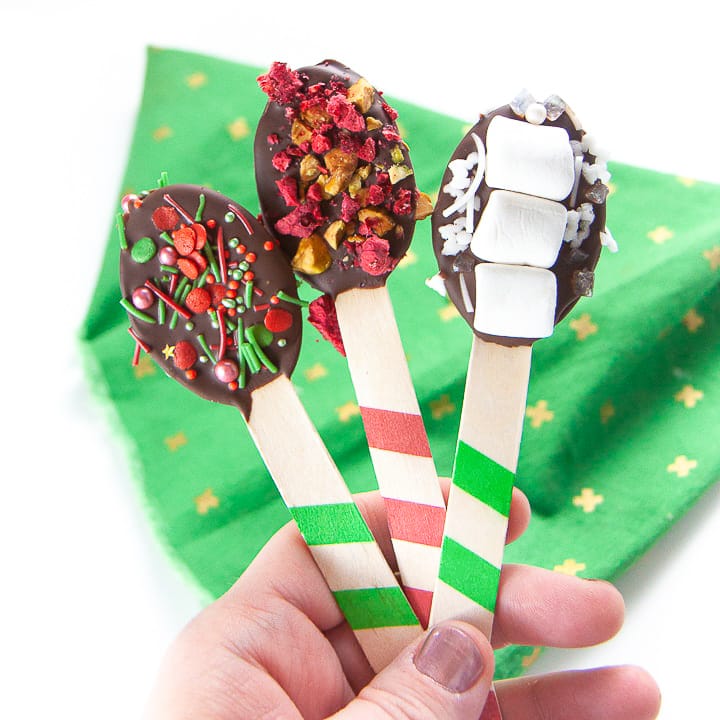
The great thing about these chocolate spoons is that they can be customized with any ingredients your family prefers! You can use dark chocolate, milk chocolate, white chocolate, regular sprinkles, any candy you prefer, etc. In fact, I have a list of over 25 fun toppings you can add-on below.
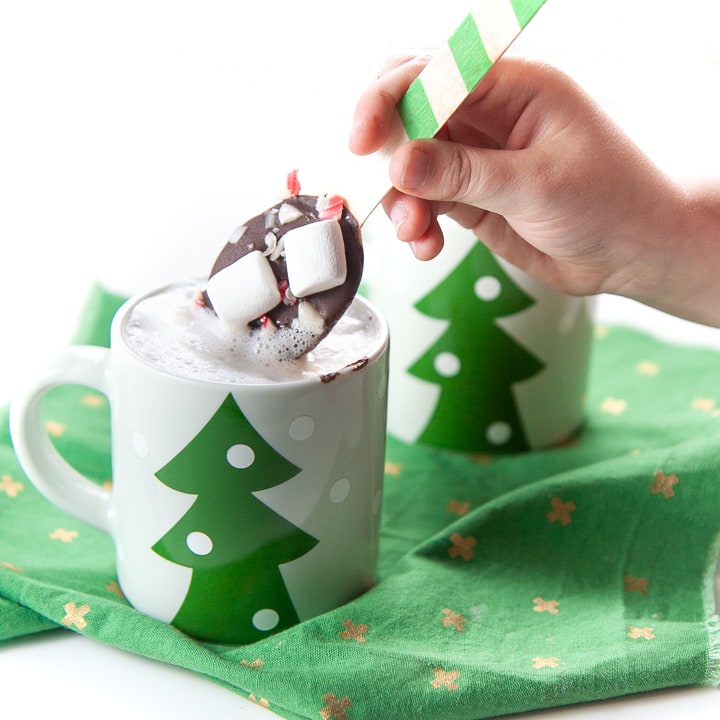
Once made, these spoons are great stirred into warmed milk or even hot cocoa for an extra amazing holiday treat!
Reasons to Love these chocolate stirring spoons
- easy to make – 15 minutes of hands-on time (1 hour of resting time)
- healthy(ish) – since you can pick the toppings, you can decide how much sugar and which toppings to add on
- easy and fun recipe to make with your toddler and kids
- make great teacher, neighbor, friend or co-worker gifts
- spoons can be stirred into milk, plant-based milk or even hot cocoa for an extra special treat
- can be made dairy, nut, gluten, soy, sugar or dye-free
- naturally gluten-free
- easy to customize to your family’s preferences
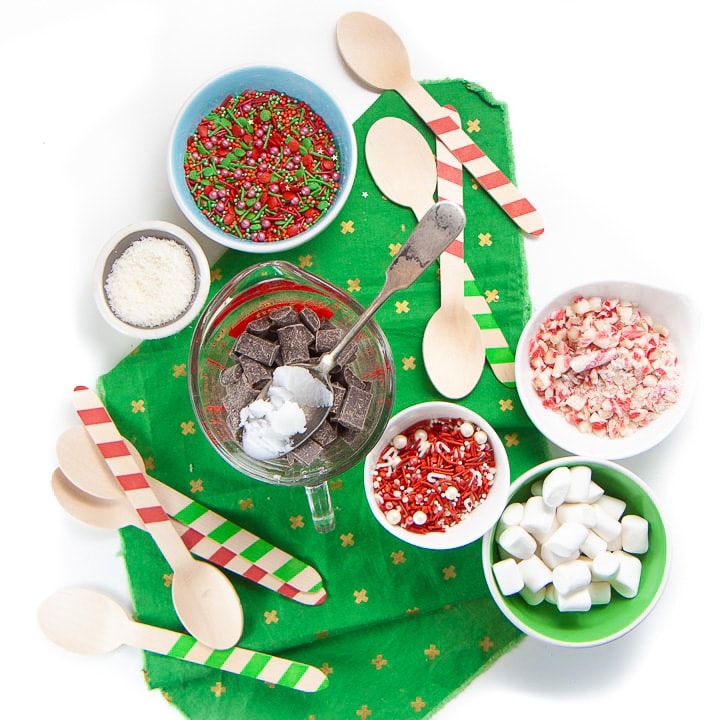
Ingredients
- Chocolate – you can use whichever chocolate you prefer for these stirring spoons – dark chocolate, semi-sweet chocolate, allergy-friendly chocolate, sugar-free or even white chocolate, or a mix-and-match of a couple of chocolates. I used the allergy-friendly chocolate since we are dairy-free.
- Coconut Oil – since we are being lazy and microwaving the chocolate, I have found that adding in just a little bit of coconut oil into the chocolate helps it get really creamy and smooth.
- Toppings – you can pick whichever toppings your family prefers or that you have on hand.
How to make kid-friendly chocolate stirring spoons
- Line a Baking Sheet: place a sheet of parchment paper on 2 baking sheets
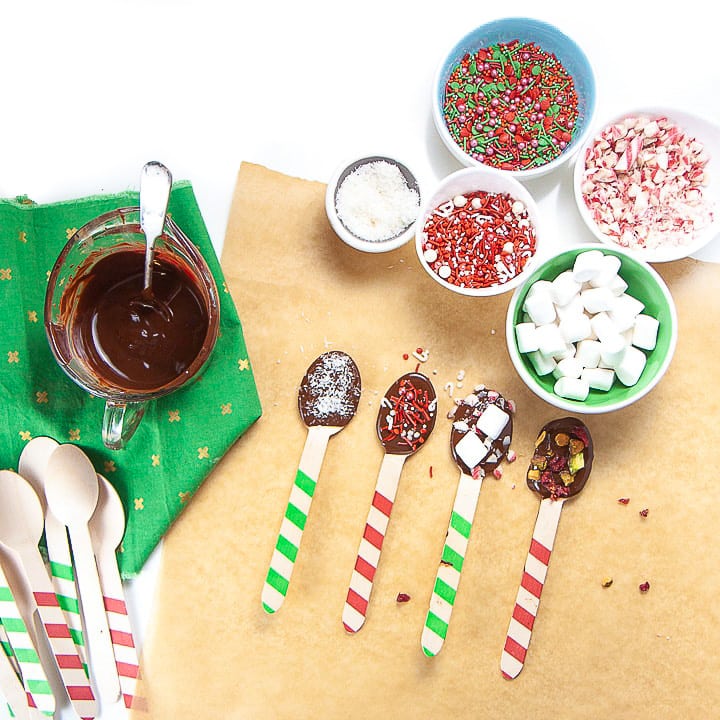
- Melt Chocolate: place the chocolate and coconut oil in a microwave-safe cup and microwave in 30-second intervals until melted, stirring between each round.
- Let Chocolate Cool: I know this seems like a weird step, but you want to put your melted chocolate in the fridge for 5 minutes and let it cool down so that it is liquid but not super runny. This way the chocolate stays on the spoon and doesn’t run off of it onto the baking sheet.
- Dip Spoons: dip wooden spoons into the cup of chocolate and fill up the middle of the spoon, dragging the back of the spoon on the edge of the cup removing any extra chocolate. Place on the baking sheet.
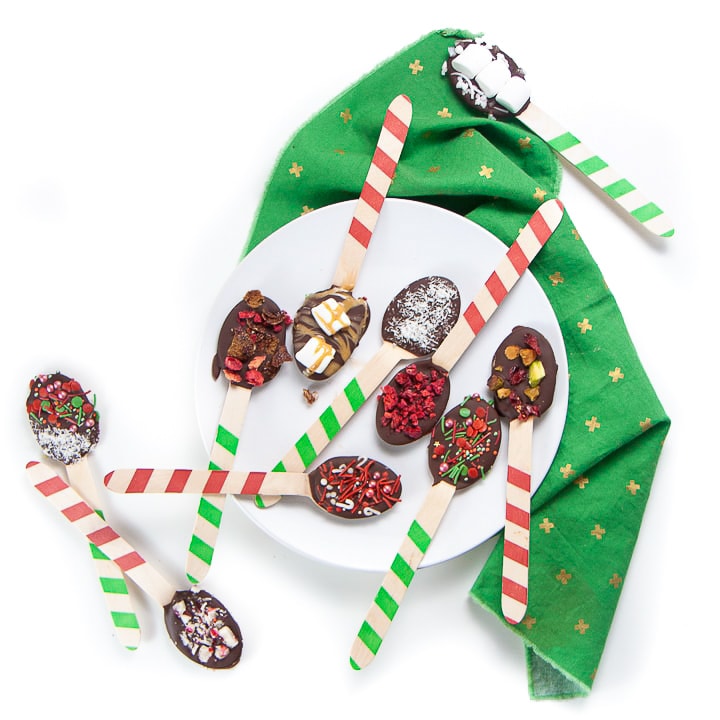
- Decorate Chocolate Spoons: sprinkle any toppings you want on top of the chocolate spoons.
- Chill: place the full baking sheet in the fridge and let cool for 1-2 hours.
Cooking with Kids
This is an easy recipe for kids of any age to help with!
Toddlers: you can melt the chocolate and dip the spoons but let them go to town on decorating them. Warning – they will probably eat half of the toppings:)
Kids: you can read the directions to them (if they aren’t reading yet) and then guide them through the process, helping at any step they get stuck on. But it’s a pretty simple concept – dunk the spoon in chocolate, then sprinkle on the fun stuff, I’m sure they will catch on to pretty quickly.
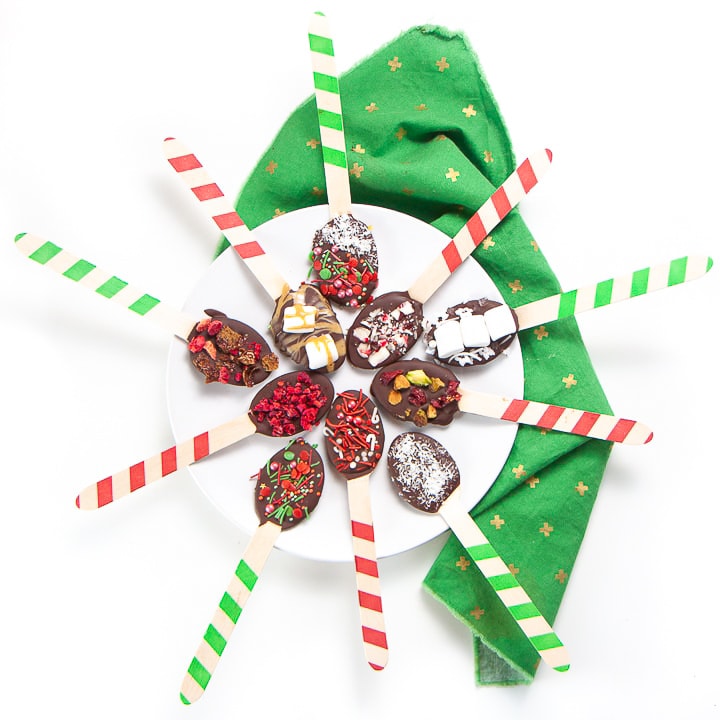
Fun Toppings
- marshmallows – I used this cleaner version, but any brand will work
- crushed candy canes – I used these dye-free candy canes (you can get them at Target) but any brand you like will work
- chopped pistachios, pecans, walnuts or almonds
- chopped dried cherries, cranberries or blueberries
- crushed freeze dried cranberries, strawberries, apples or blueberries
- crushed cereal – my kids loved this one
- vanilla granola
- shredded coconut
- warmed peanut butter
- sprinkles – I used these dye-free sprinkles, and we also love this and this brand of dye-free sprinkles as well, but again any brand of sprinkles you like will work
- crushed cookies – oreos, vanilla wafers, etc
- crushed graham crackers – would be great paired with marshmallows
- peanut butter chips
- white chocolate chips
- mini dark chocolate chips
- any small candy
- chopped butterscotch
- chopped chocolate mints
- warmed nutella
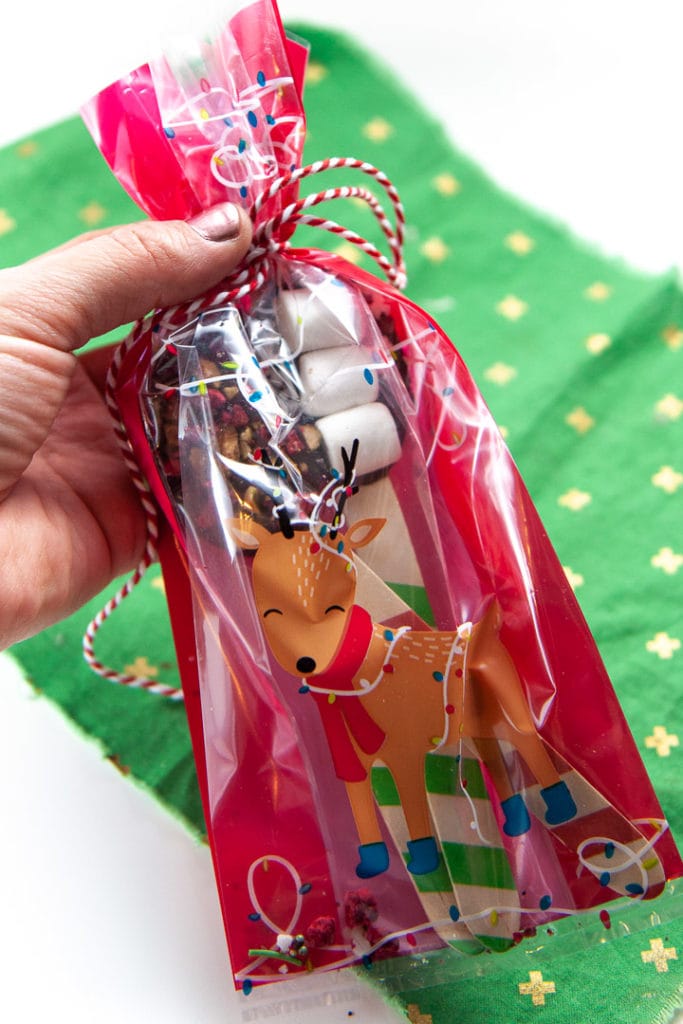
Once cooled, these Chocolate Stirring Spoons make a great and easy gift for teachers, neighbors, friends or co-workers!
MORE FUN HOLIDAY RECIPES FOR TODDLER
- Healthy Grinch Mini Muffins for Baby + Toddler
- Dark Chocolate Cherry + Almond Clusters
- Easy Chocolate Fondue for Toddlers + Kids (Dairy-Free)
- Healthy Hot Turmeric Cocoa for Toddlers + Kids
- Cranberry Snowballs with Cashew + Coconut
Get the recipe: Chocolate Stirring Spoons
Ingredients
Chocolate Stirring Spoons
- 3/4 cup chocolate chips or chunks (see notes)
- 1 tsp coconut oil
- 1 cup varitey of toppings (see list below)
- 20-24 wooden or plastic spoons
Serve With
- 8 oz warmed milk, planet-based milk or hot cocoa
Instructions
- Prep: Line 2 baking sheets with parchment paper. Set aside.
- Melt: In a microwave-safe cup or tall bowl, add in the chocolate and coconut oil. Microwave in 30 second intervals until chocolate is melted, stirring after each round. It took 2 minutes for my chocolate to melt.
- Cool: Place the cup of melted chocolate in the fridge for 5 minutes to let it cool. You want it be able to stay on the spoon – so melted but not super runny.
- Dip: take a spoon and dip it into the melted chocolate, leaving the cup portion of the spoon full of chocolate, scraping any excess chocolate that is on the back of the spoon on the top of the cup. Place the spoon on the parchment paper.

- Decorate: Using any toppings you prefer, decorate the spoons with any toppings you prefer.
- Repeat: Repeat the process until all of the chocolate is used – roughly 20-24 spoons. I used the spoon I stirred the chocolate with to help me at the end get the spoons covered with chocolate.
- Chill: Place the baking sheets in the fridge and let chill for 1-2 hours.
- Store: Once hardened, you can store at room temperature.
Notes
- marshmallows
- crushed candy canes
- chopped pistachios, pecans, walnuts or almonds
- chopped dried cherries, cranberries or blueberries
- crushed freeze-dried cranberries, strawberries, apples or blueberries
- crushed cereal
- vanilla granola
- shredded coconut
- warmed peanut butter
- sprinkles
- crushed cookies – oreos, vanilla wafers, etc
- crushed graham crackers – would be great paired with marshmallows
- peanut butter chips
- white chocolate chips
- mini dark chocolate chips
- any small candy
- chopped butterscotch
- chopped chocolate mints
- warmed Nutella
Did you make this recipe?
Tag @babyfoode on Instagram and hashtag it #babyfoode!

1 Comment on “Kids Chocolate Stirring Spoons (Allergy-Friendly)”
It is awesome and delicious I made this for breakfast and my kids loved it!