Instant Pot Baby Food (15 Puree or Baby-Led Weaning Recipes)
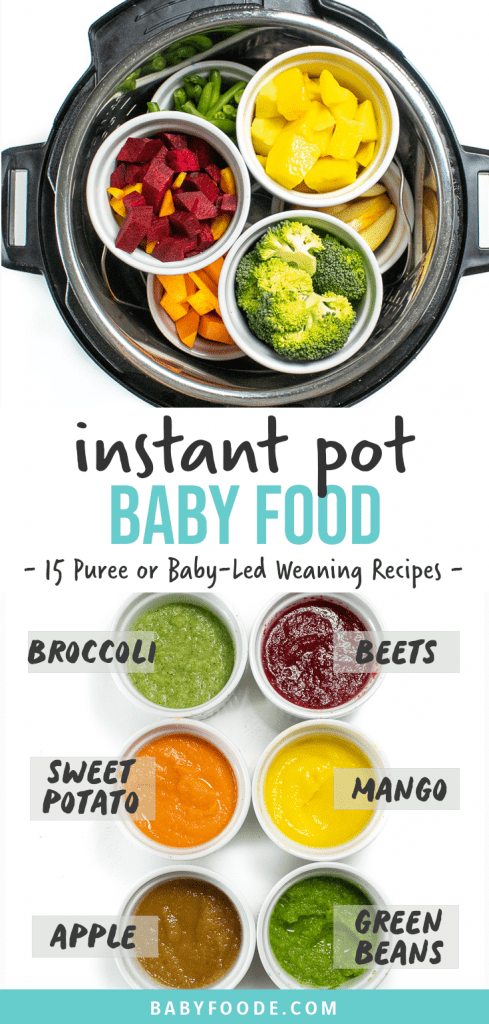
Instant Pot Baby Food: a quick way to make baby food purees or finger foods for baby-led weaning! Up to 6 different baby foods made in 3 minutes! Great for 6 months and up!
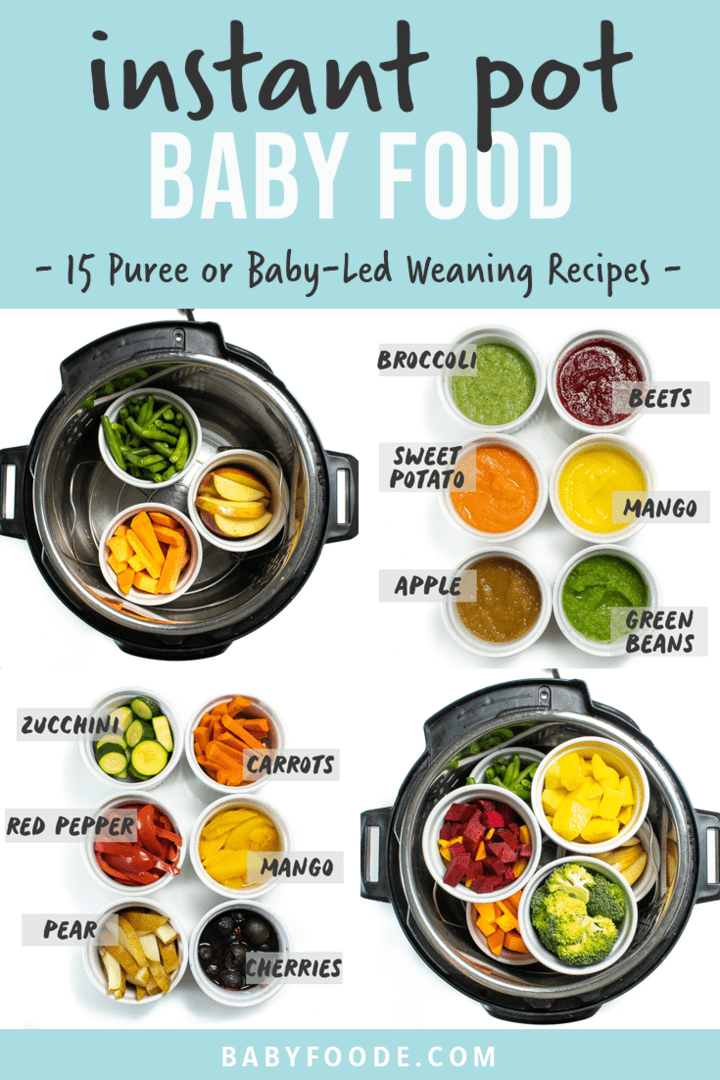
Instant Pot Baby Food
Making your own homemade baby food couldn’t be easier with the Instant Pot!
Using this time-saving kitchen tool, we are able to cook 6 different baby food purees or finger foods for baby-led weaning in 3-minutes – with only the touch of a button #mindblown!
If you are looking to save time, while making your little one delicious and nutritious baby food – then you are in the right spot!
Instant Pot Baby Food Video
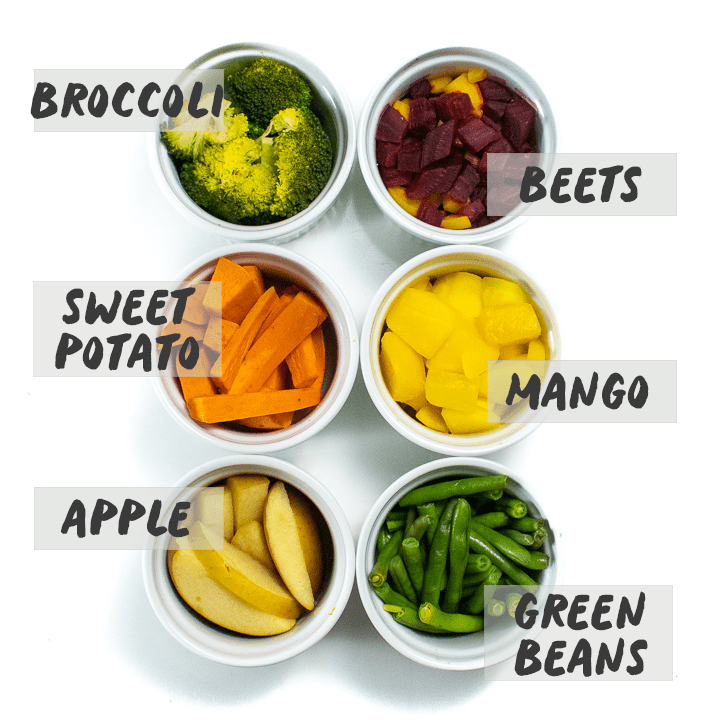
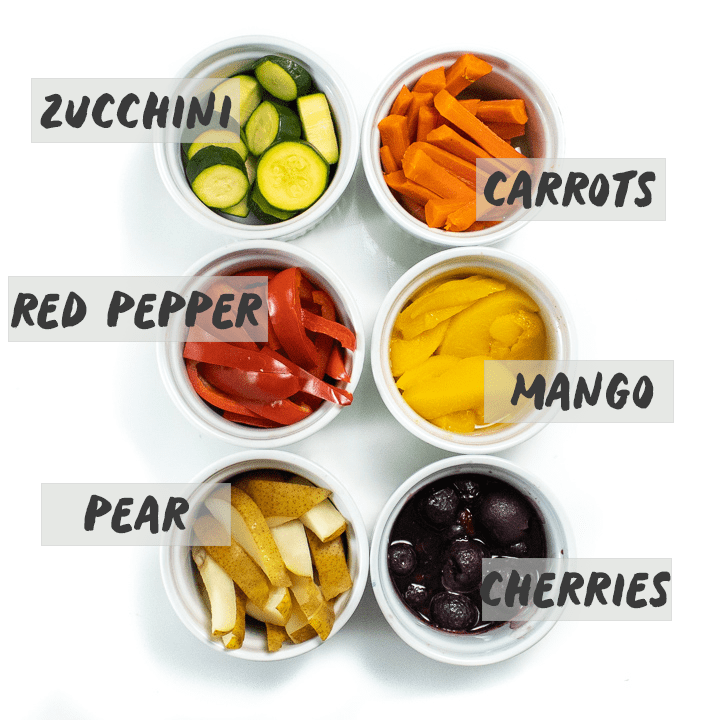
What Fruits and Vegetables Can You Cook for Baby
You can cook almost any fruit or veggie in the instant pot that you would steam on the stovetop. Here are list of my favorites.
Vegetables
- sweet potato
- carrots
- broccoli
- zucchini
- squash
- beets
- red pepper
- peas
- green beans
- asparagus
Fruits
- apple
- pear
- peaches (frozen or very firm work best)
- mango (frozen or very firm work best)
- cherries (frozen work best)
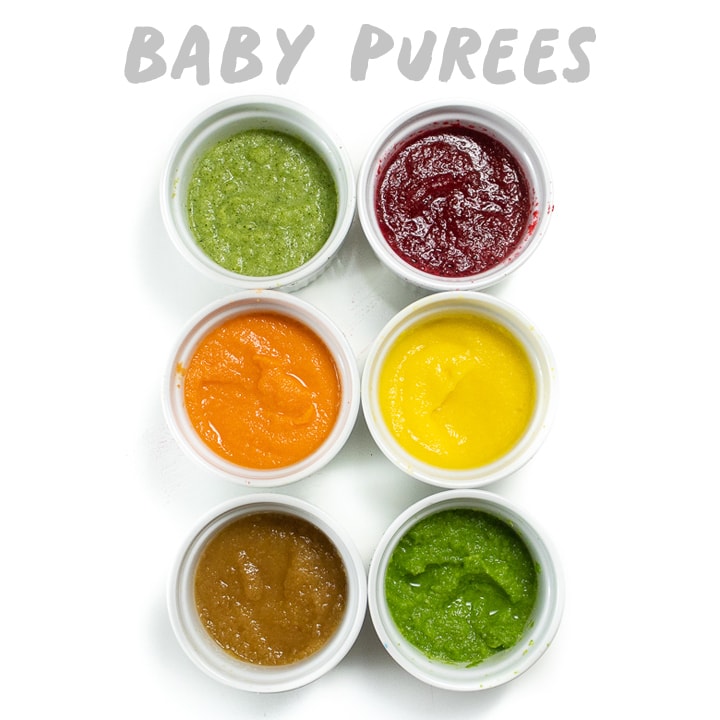
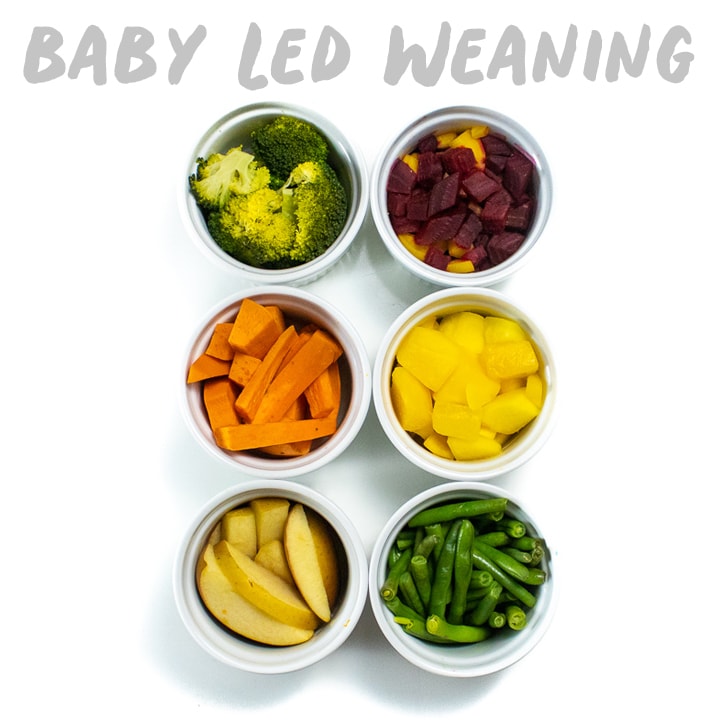
Baby Purees vs. Baby-Led Weaning
Let me be clear here – there is no right or wrong to feed your baby!
Purees are the more traditional way to start feeding your baby and include cooking and blending down fruit, veggies, and grains into a smooth puree that you feed to your baby. On the other hand, baby-led weaning is a newer concept where you give your baby chunks of food and let them feed themselves.
Both feeding techniques are driven by the simple principle of introducing your baby to new foods to develop eating skills and expose your baby to different flavors and consistencies – they just go about it different ways.
How to Use the Instant Pot to Make Baby Food
Here is a quick step-by-step overview of how to make baby purees or foods for baby-led weaning. You can find more in-depth instructions below.
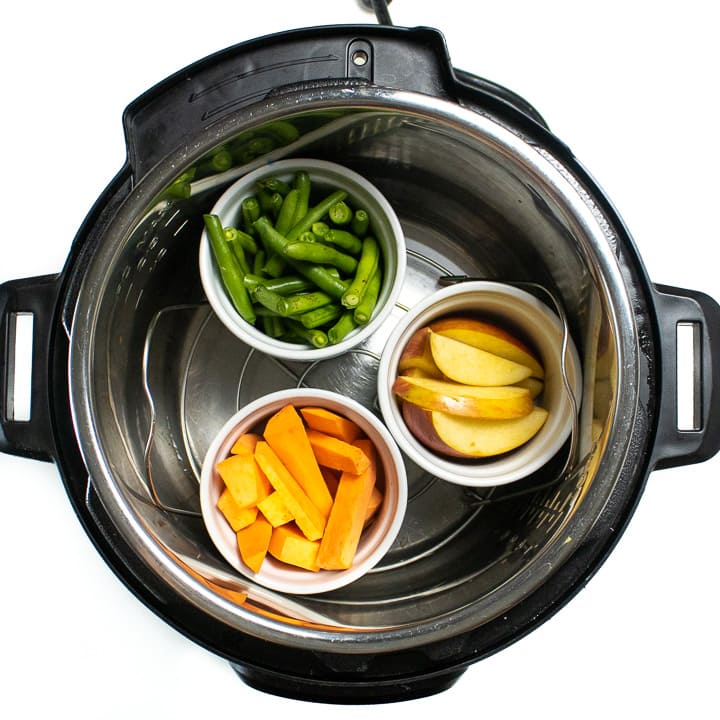
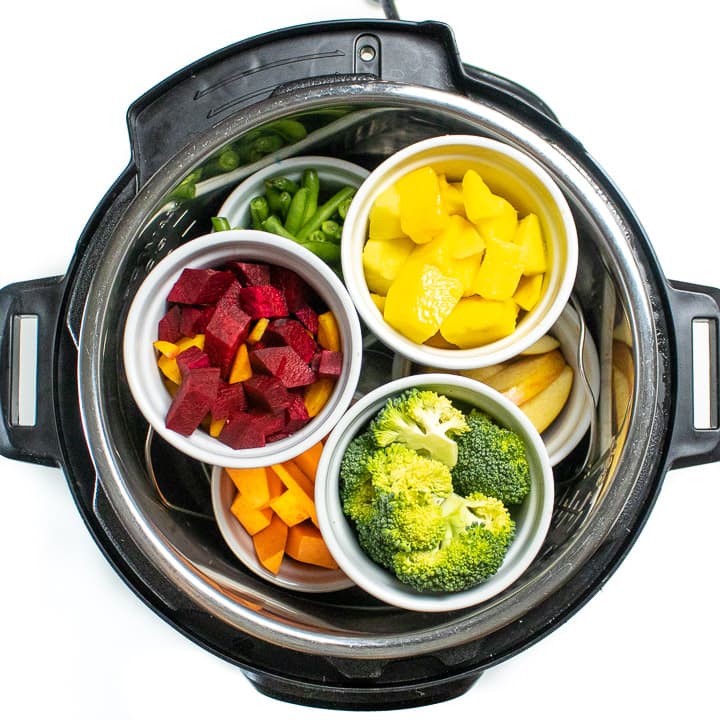
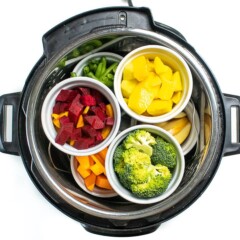
- Prep Instant Pot: pull in the Instant Pot and add the trivet to the bottom.
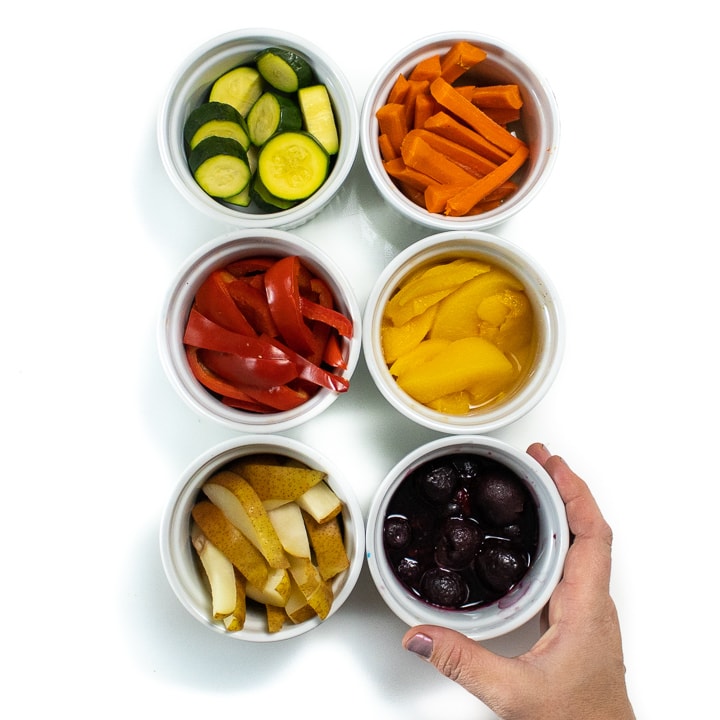
- Prep Produce: peel and chop produce according to directions. Add the prepped produce to separate ramekins. If making a bigger batch of a baby food, you can use a steamer basket.
- Water: add in water to the bottom of the instant pot.
- Layer: if using ramekins, place 3 ramekins on top of the trivet and then place another layer of 3 ramekins on top of the bottom row.
- Cook: lock the lid on tight, place the valve in the sealing position. Selection the Manual High Pressure and set the time for 3 minutes.
- Quick Release: Once the timer is up, quick release the pressure, turn off the Instant Pot and remove lid. Let the ramekins cool for a few minutes.
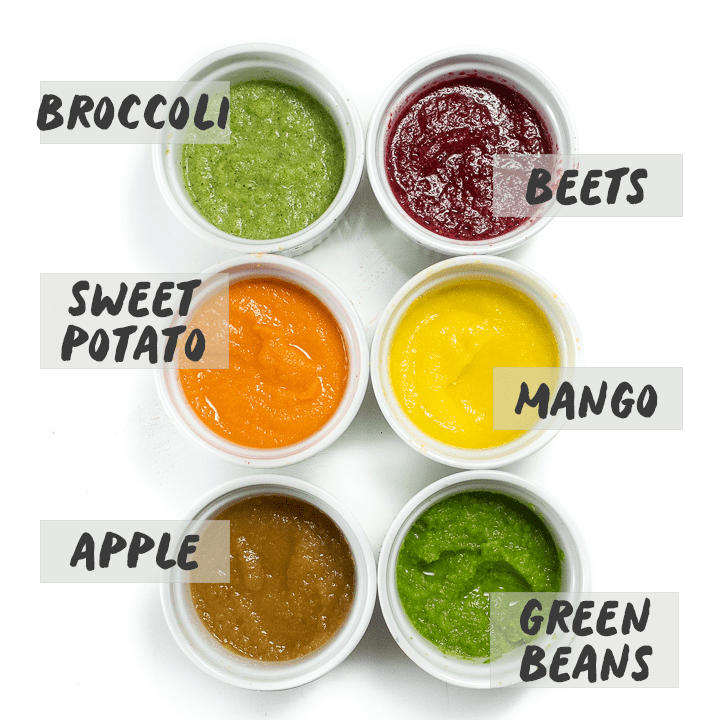
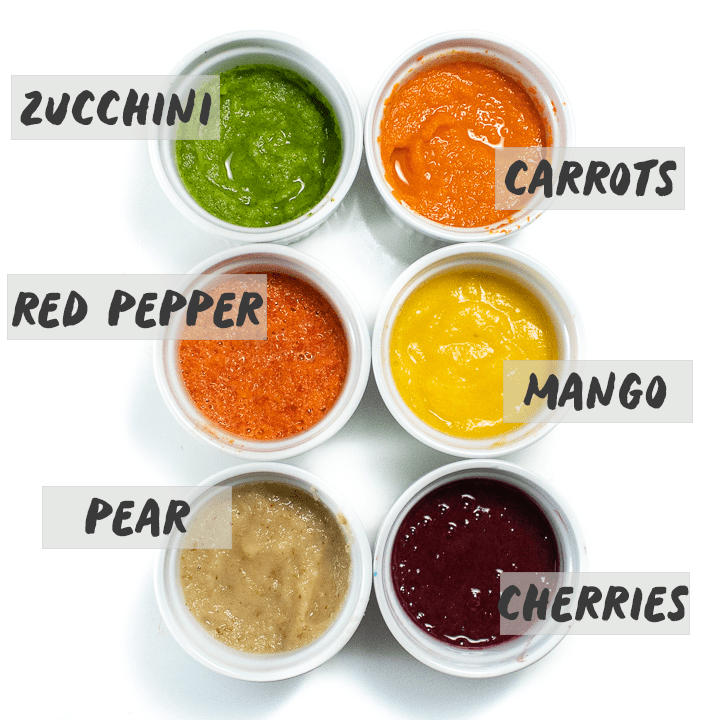
- Puree for Baby Puree: transfer the cooked produce to a blender, food processor or larger bowl and puree. Since the produce is very tender, you can also just mash it with the back of a fork.
- Strain for Baby-Led Weaning: if you are serving the produce whole for baby-led weaning, you will want to strain out any liquid that is at the bottom of the ramekin.
- Eat: serve the puree or store for another meal.
How to Store Baby Food
Purees
You can store these purees in the fridge for up to 4 days or in the freezer for up to 4 months.
Baby-Led Weaning
You can store these finger foods in the fridge for up to 4 days. Some finger foods can be frozen for up to 4 months. The hardier vegetables such as carrots, sweet potatoes, green beans, beets, squash, etc, are super easy to freeze. Tender fruit and veggies such as pears, red peppers, zucchini are a little tougher as they tend to get mushy when frozen.
Label Tip: Don’t forget to label your purees before you place them in the fridge or freezer with the name and date you made them. Take it from me, you will completely forget when and what is in your freezer by the end of the week;).
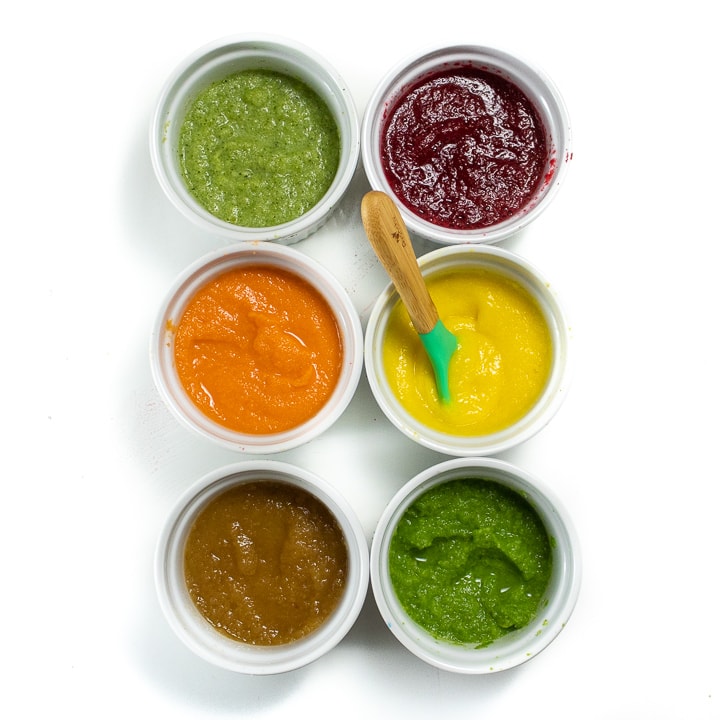
Stage 2 Combinations
While these single purees are delicious as is, it’s also super easy to mix and match with other nutrient-dense baby food purees. When your baby is ready, give these fun flavor combos a try!
- Sweet Potato + Beet + Banana
- Broccoli + Pear
- Peas + Mango + Avocado
- Green Beans + Peas + Banana
- Red Pepper + Sweet Potato + Mango
- Squash + Peach
- Beet + Banana
- Asparagus + Avocado
- Sweet Potato + Carrot + Mango
- Green Beans + Peas + Broccoli
- Beet + Carrot + Pear
Tips for Making Baby Food in an Instant Pot
- Ramekins: I love these 10oz ramekins as I can easily fit 6 of them in my instant pot at the same time. The size and depth of your brand of Instant Pot and ramekins will determine how many will ultimately fit in there. If you don’t want to invest in a set of ramekins for just this recipe, you can use any bowl or jar labeled as “oven-safe” and some popular brands are Pyrex, CorningWare, Anchor Hocking and canning jars.
- Chopping: if you are going to puree your fruit and vegetables, then I would roughly chop them into cubes as you will be able to fit more produce into each ramekin. If you are going to serve as finger foods – then I would slice them into 2-3″ strips. Exceptions: for beets, I would chop into smaller chunks and then once cooked I would either mash with a fork (creating a pancake of sorts) or dice into “pea” size shapes. For zucchini, I would slice into rounds, cook and then before serving cut into “pea” size shapes. I have found that strips of beets and zucchini don’t always hold up as well and can get super mushy.
- Blending: since you are making such a small quantity of baby food with this method, I have found that using a food processor or handheld emersion blender work the best to get a smooth puree. You will want to also drain any liquid from the ramekins before transferring them to another bowl or food processor to blend. If the puree is too thick, you can add the liquid back in a little at a time.
- Chunky – Stage 3 Puree: since this method makes the produce super tender, you can easily mash the produce with the back of fork for a chunky stage 3 baby puree.
Get the recipe: Instant Pot Baby Food
Ingredients
Vegetables
- 1 1/2 cups broccoli florets
- 1 1/2 cups sweet potatoes, peeled and cut into 2-3" strips for BLW or cubes for puree
- 1 1/2 cups carrots, peeled and cut into 2-3" strips for BLW or cubes for puree
- 1 small zucchini, cut into rounds, peeling is optional
- 1 1/2 cups squash (butternut, acorn, winter), fresh or frozen works – peeled and cut into 2-3" strips for BLW or cubes for puree
- 2 medium beets (red or golden), peeled and cut into 2-3" strips for BLW or cubes for puree
- 1 red pepper, cored and cut into 2-3" strips for BLW or cubes for puree
- 1 1/2 cups peas, fresh or frozen
- 1 1/2 cups green beans, fresh or frozen, trimmed and cut into 2-3" strips for BLW or small strips for purees
- 1 1/2 cups asparagus, fresh or frozen, trimmed and cut into 2-3" strips for BLW or small strips for purees
Fruit
- 1 medium sweet apple, leave the skin on and cut into 2-3" strips for BLW or peel and cut into cubes for puree
- 1 medium pear, leave the skin on and cut into 2-3" strips for BLW or peel and cut into cubes for puree
- 1 1/2 cup peaches, frozen or very firm work best, peeled and sliced
- 1 1/2 cup mango frozen or very firm work best, peeled and sliced
- 1 1/2 cup pitted cherries, frozen work best
Base of Instant Pot
- 1 cup water
Instructions
- Prep Instant Pot: plug in the Instant Pot and add the trivet to the bottom.
- Prep Produce: peel and chop produce according to directions. Add the prepped produce into separate ramekins. If making a bigger batch of baby food, you can use a steamer basket.
- Water: add in 1 cup of water to the bottom of the instant pot.
- Layer: if using ramekins, place 3 ramekins on top of the trivet.

- Second Layer: you can either add another row of ramekins or a steamer basket filled with additional food.
- Cook: lock the lid on tight and place the valve in the sealing position. Selection Manual High Pressure and set the time for 3 minutes.
- Quick Release: Once the timer is up, quick release the pressure, turn off the Instant Pot and remove the lid. Let the ramekins cool for a few minutes until you can safely touch them, they will be hot.
- Puree for Baby Puree: using a slotted spoon, transfer the cooked produce to a blender, food processor or larger bowl, leaving any liquid in the ramekin. Puree until smooth adding liquid to the puree in small quantities as needed. Since the produce is very tender, you can also just mash it with the back of a fork for a chunkier puree.
- Strain for Baby-Led Weaning: if you are serving the produce whole for baby-led weaning, you will want to strain out any liquid that is at the bottom of the ramekin.
- Eat: serve the puree or store for another meal.

Notes
Did you make this recipe?
Tag @babyfoode on Instagram and hashtag it #babyfoode!

14 Comments on “Instant Pot Baby Food (15 Puree or Baby-Led Weaning Recipes)”
Hi! Love your website! I was so excited when i found this since i am new to the world of pressure cooking. Gave it a go with chopped broccoli, beets and apple for BLW. Cooked for 3 minutes but unfortunately everything was still a bit hard (did not pass the squish test). Should I have left it an extra minute or do natural release? Would love some tips thanks!
Hi Alex! That is strange as 3 minutes should be ample time in the Instant Pot. Make sure you are cooking on high pressure. Did you start with all frozen? If so, perhaps try one more minute and a quick release after its sat for a few minutes. Let me know how it turns out next time. xo, Michele
I’m excited to try this! Putting everything in a huge steamer is such a hassle and the designs on my Pyrex containers have begun to peel off through so many cycles of steaming. Totally forgot about the plain white ramekins. Yay thanks for the very useful tips!
I love using my instant pot to make baby food! So easy and fast! Let me know how it works for you.
Instapot baby food prep is a game changer! Even the carrots were super tender after just 3 minutes. Much more efficient than steaming on the stove or using the Nutribullet baby Turbosteamer. Thanks a bunch! Wish I found your site sooner! 😊
What size instant pot are you using? I have the 6-qt instant pot and I’m wondering if all the ramekins will fit (I didn’t buy ramekins yet). This looks so simple to do, I’m excited to try it. Thanks!
I have this 6 quart instant pot and used these ramekins. Hope that helps!
These are great! How much water should be added? I was guessing one cup but wasn’t sure. I’m assuming the amount of water matters? Thanks for the amazing recipes!!
Yes, 1 cup! I just fixed the recipe card. Thanks!
Oh, my! This looks and sounds absolutely delicious. My husband will love this. I have a question. What brand of peanut butter do you use? Just regular Peter Pan, or are you using natural PB?
Thank you for all the great tips, too!
Are you referring to the baby food or another recipe?
That’s amazing information. Thanks for sharing and love your site
I am so glad you found it helpful! Glad you are here 😊
Wow, instant pot recipe for baby. Instant pot recipe for me and my husband is already on my to-do list and I was looking for something same for my baby. I will definitely make this. Thanks a lot for sharing the recipe.